TunePat Music One is crafted for users who require high-efficiency streaming music converters. It supports extracting music tracks or audiobooks from the most popular streaming apps, including Spotify, Amazon Music, Apple Music, Tidal, YouTube Music, YouTube, SoundCloud, Deezer, Line Music, Pandora Music, Audible, and more. This page provides detailed information on the operation instructions of this comprehensive all-in-one converter.
- 1. How to Register TunePat Music One?
- 2. How to Use TunePat Music One to Convert Songs?
- 2.1 Select One Conversion Source
- 2.2 Finish the Output Settings
- 2.3 Add and Convert Music from the Music App / Web Player
- 2.4 Record Music from the Website
- 2.5 Browse the Conversion History
- 3. How to Download Podcasts for Free?
- 4. How to Record Radio for Free?
- 3. Handy Tools: AA/AAX Converter, Format Converter, Burn CD, and Tag Editor
1. How to Register TunePat Music One?
TunePat has a user-friendly interface and it is quite easy to register for the program. After purchasing, you will receive a confirmation email, including your registration information.
Step 1 Click the "Menu > Register" option in the upper right menu bar to jump to the registration interface to register the program.
Step 2 Then copy and paste the registration Email and Code into the registration window. Click on "Register" to make a confirmation.
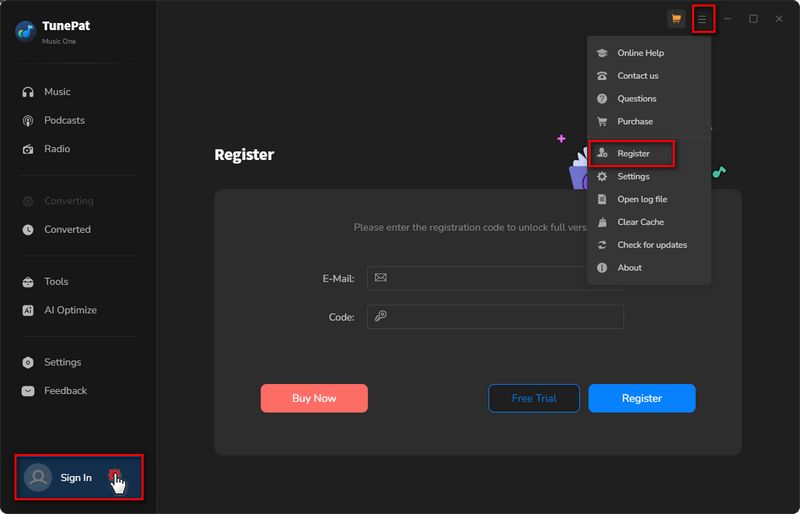
Note: Please refrain from adding any whitespace characters at the beginning or end of the license key.
2. How to Use Music One to Convert Songs?
2.1 Select One Conversion Source
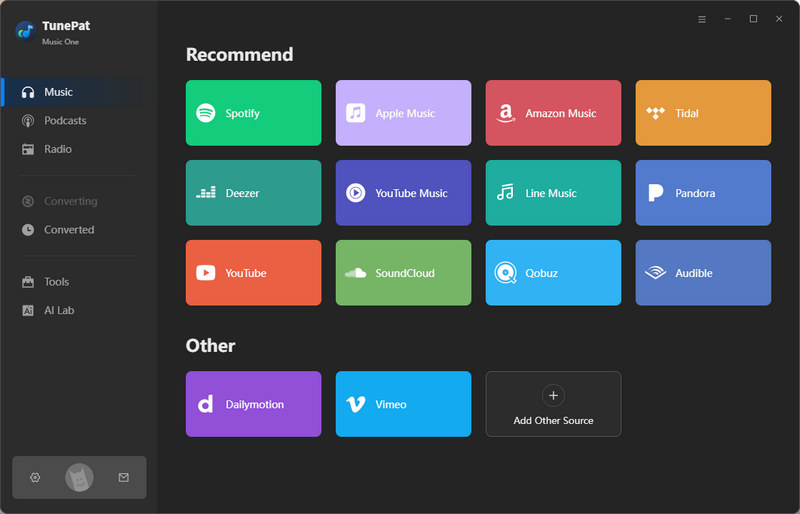
Step 1 Open TunePat Music One on your computer. On the start-up interface, you can see all available streaming music sources. Tap on the music platform from which you are going to extract music. Next, we will use "Spotify" as an example.
TunePat Music One acquires music from different sources in different ways. The details are as follows:
1. Support getting music from the APP: Spotify, iTunes/Apple Music, Amazon Music, Tidal
2. Support getting music from the Web player: Spotify, Apple Music, Amazon Music, Tidal, YouTube Music, YouTube, SoundCloud, Line Music, Pandora
3. Support getting music from the Website: Audible, Dailymotion, YouTube, Vimeo, SoundCloud
TIPS: If you want to get music from another source, click the "Add Other Source" button and enter or copy-paste the corresponding website URL.
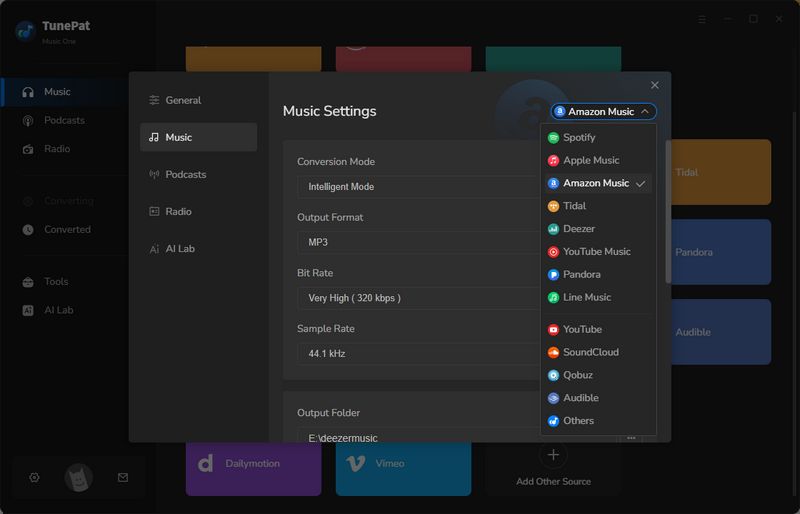
2.2 Finish the Output Settings
Click the "Settings" button on the left menu bar, and then you can select the corresponding platform in the upper right corner of the pop-up window, such as switching to Spotify. When you convert songs for the corresponding platform, the program will apply your changes by default until you make changes next time.
In this interface, you can customize some necessary parameters, such as conversion mode, output format (MP3, AAC, FLAC, WAV, AIFF, ALAC), bite rate, sample rate. output folder, output file name, and more.
Tips:
1. Drag the slider on the right side of the pop-up window to the bottom of the page, and you will see a "Save lyrics (if provided)" button. This button is off by default and can be turned on manually if needed.
2. When you choose to convert songs from different sources and turn on the song saving function, TunePat will export the songs to LRC or TXT format. For more information on how Music One retains lyrics from other streaming platforms, check out the answer to "Does Music One support retaining lyrics files?" on the FAQ page.
3. When you convert audiobooks from Audible, the output format options in the Settings module are different, divided into Original, M4A, M4B, and MP3. The quality is divided into High Quality and Small Size. Please select as needed.
2.3 Add and Convert Music from the Music App / Web Player
Let's take Spotify as an example to explain how to add and convert songs from the APP or the Web player.
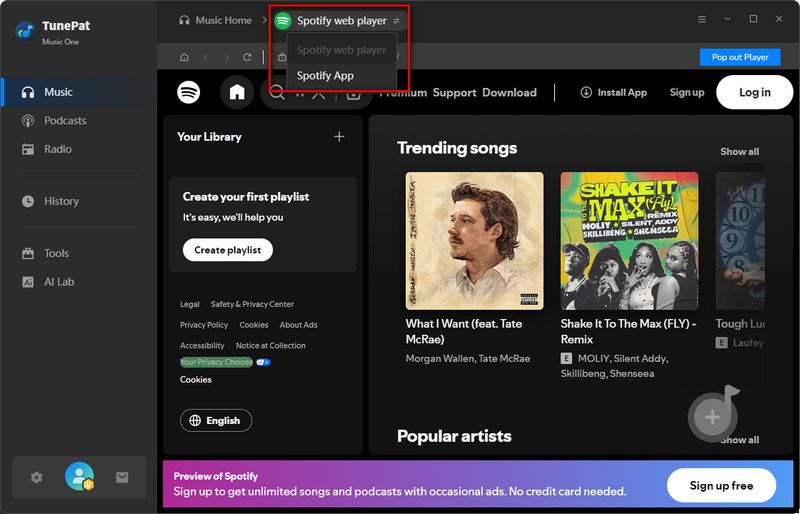
Step 1 Log in to Your Spotify Account
When you open the program, you will see the following interface. You can switch between "Spotify App" or "Spotify web player". When you choose to convert songs from web player, you can directly access it on the current page, or you can click "Pop out Player" to pop up in a new window. Follow the instructions at the top of the screen to log in to your Spotify account.
*Note:
1. When you get songs from the Amazon Music, Spotify or Tidal, you can choose to both convert from the App or the web player. You can click on the "XXX App" / "XXX web player" to change the music source.
2. When you choose to get songs from the App, in addition to one-click parsing, you can also click and hold the song cover to place it in the "Drag the music here" box, then release it to parse it. Or you can copy its URL into the box and click "+" to start parsing.
3. The method of getting songs from iTunes / Music app is slightly different, please refer to this tutorial for details.
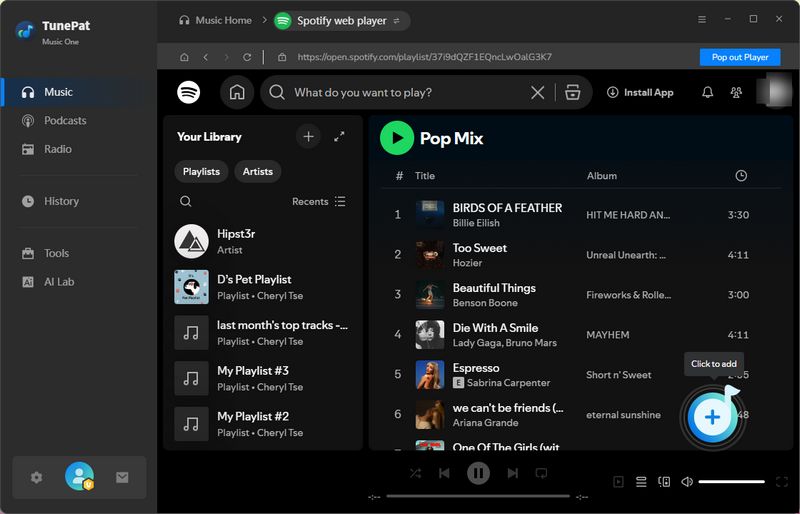
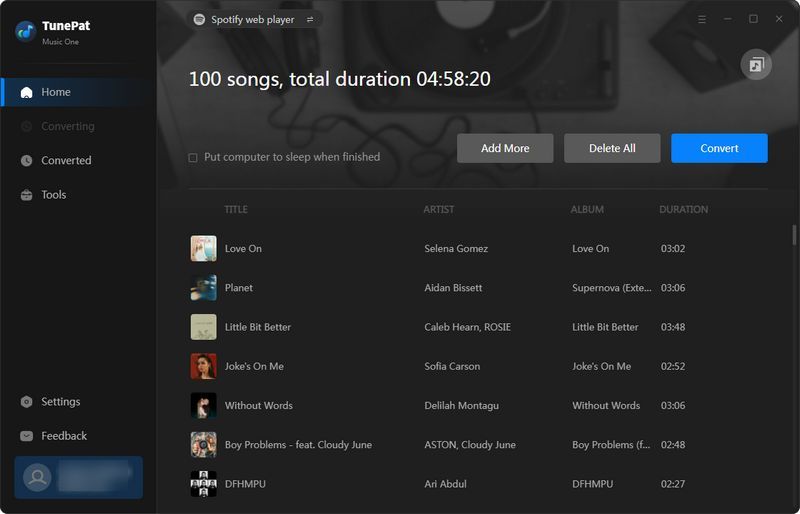
Step 2 Open & Analyze the Spotify Songs You Wish to Convert
Open the Spotify song, album, or playlist you want to convert and click the blue "Click to add" button in the lower right corner.
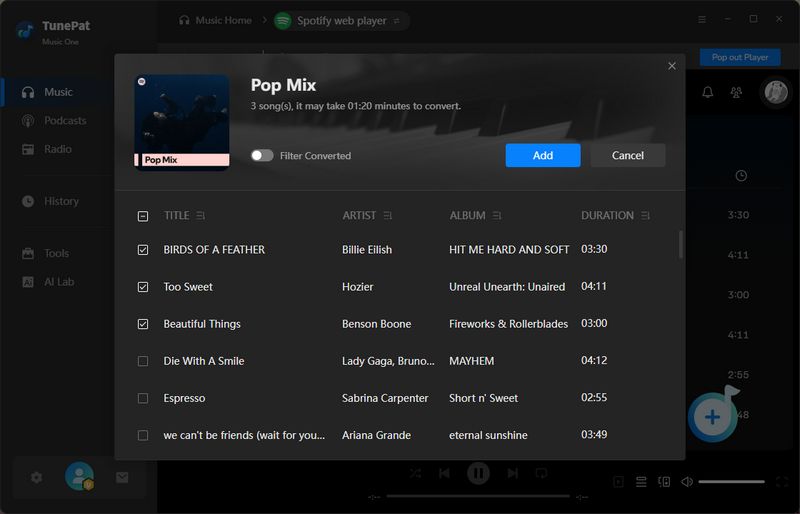
Step 3 Add Spotify Music to TunePat
Once the Spotify songs have been retrieved, they will be listed in a pop-up window with all of them initially selected. You can manually deselect songs you don't want to convert, and then click "Add" to include these chosen songs to TunePat.
Step 4 Convert Spotify Music to PC
If you wish to select additional songs for conversion, you can click "Add More". Otherwise, simply click "Convert", and the program will promptly initiate the conversion process.

2.4 Record Music from the Website
Next, we will provide a step-by-step guide on how to record music from Dailymotion, Vimeo, or other websites. Let's take Dailymotion as an example to explain the steps.
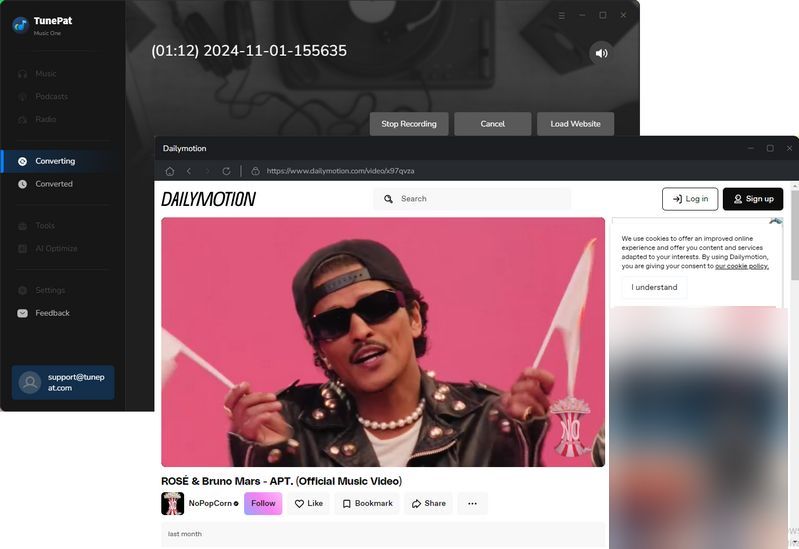
Step 1 Log in to the Account of the Corresponding Website
Click on "Dailymotion". Then you will see a new window pop up automatically, showing the content of the Dailymotion official website, just like when you access it from the browser. All you need to do is log into your account and find the music you want to record.
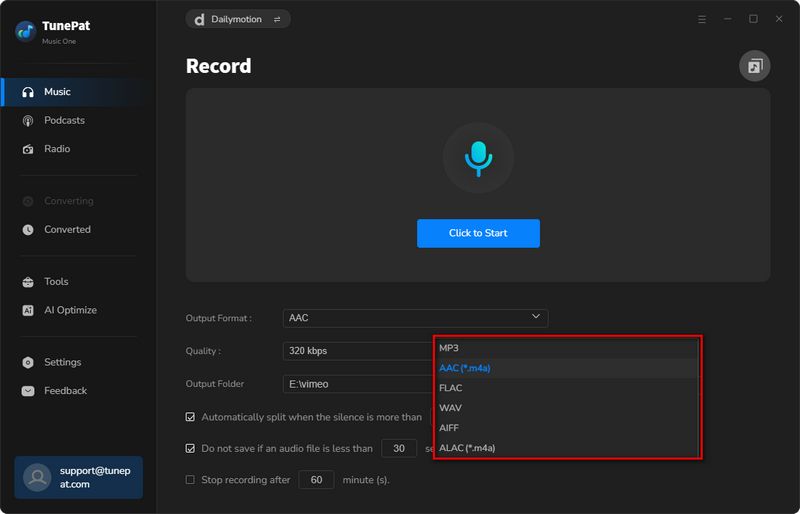
Step 2 Customize Output Format, Quality & Other Parameters
As you can see, when you choose to get songs from a website, the Music interface has some necessary output settings, including output format, quality, and output folder. Based on your actual needs, you can also decide whether you want the program to automatically detect the audio being played and do some processing, such as automatically cutting long audio, automatically filtering too short audio, or setting it to stop recording at a certain length.
Step 3 Start Recording Audio from Dailymotion or Other Websites
Please log in to your account and open the music you want to record. Then click the blue "Click to Start" button on the main interface to start recording. After recording, click "Stop Recording". Then, the recorded songs will be automatically saved to the output path you set.
2.5 Browse the Conversion History
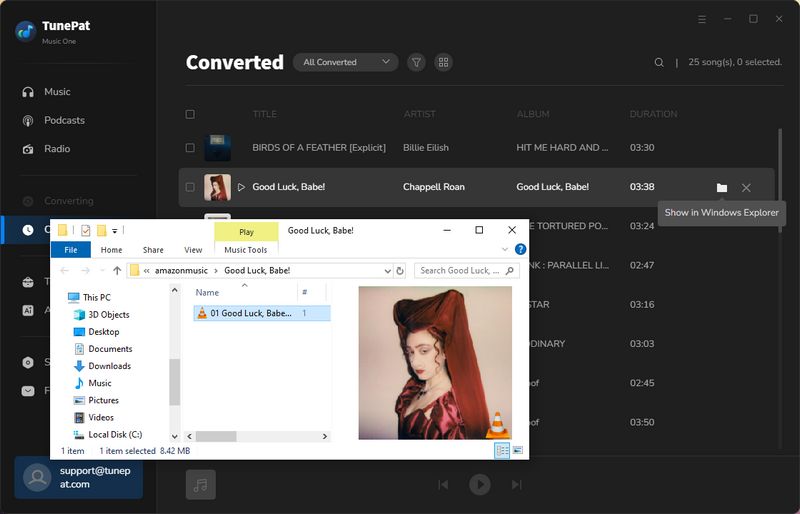
Once done, you can browse the converted items by clicking the "History" module on the left. Move the mouse over each song and you will see a "Show in Windows Explorer / Show in Finder" icon appear on the right. Clicking on this pattern will automatically jump out of the local folder location where the file is stored. These songs are no longer limited to streaming apps, you can play them on multimedia players on any computer or other device.
The menu bar has a funnel-shaped filtering option. You can click and select converted songs for different platforms from the drop-down menu to browse. Double-click them to play them directly within TunePat.
3. How to Download Podcasts for Free?
TunePat Music One has a podcast module that provides you with free podcasts from 100+ websites including BBC, TED, Podbean, NPR, ESPN, The Verge, Wondery, Podbay, and more. You can play them online, or download them individually or in batches. The operation is very simple, as shown below:
Step 1 Visit the Podcasts Module
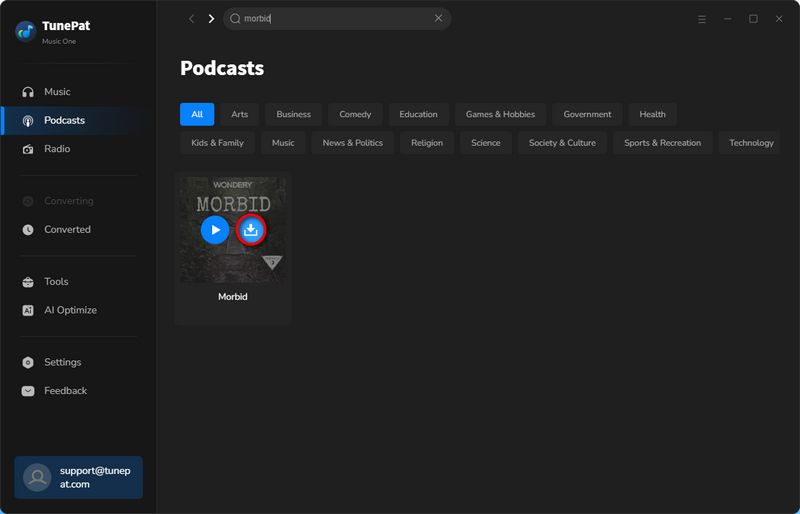
Click on "Podcasts" on the left panel. As the interface shows, different podcasts are listed here under different categories. You can use the search bar at the top to find podcasts directly by name or author.

Step 2 Choose to Analyze the Podcasts
When you type in the name of the podcast, the search results are displayed directly below. When you move your mouse over the podcast, you can see the Play and Download buttons. When you directly click the Download button here, the program will directly start parsing all the current convertible podcasts.
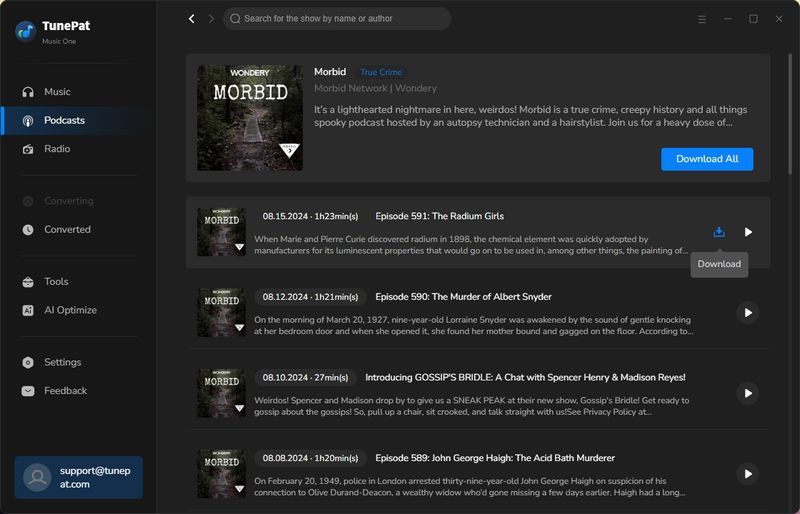
Of course, you can also choose to convert a certain episode you like individually. you just need to click on the cover of this podcast and then view more details about the episode. Then move your mouse next to the episode you want to convert and click the Download icon on the side. Or, click "Download All" to parse all the content.
Step 3 Convert the Selected Podcasts to MP3 or MP4
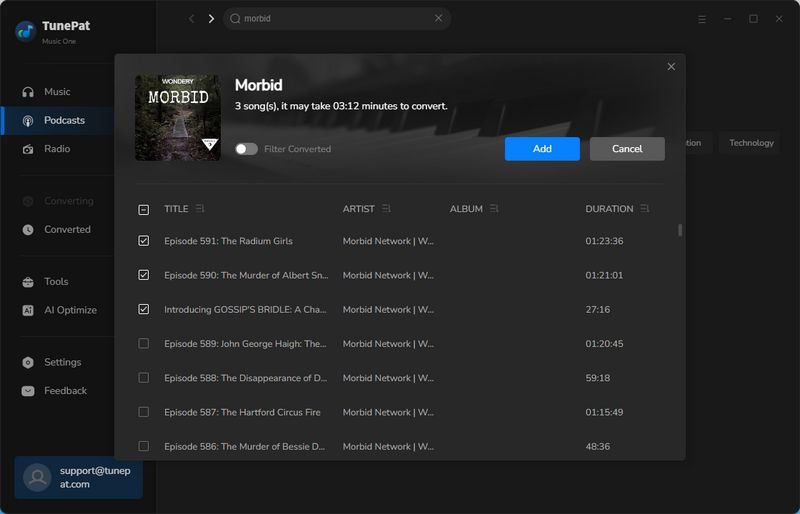
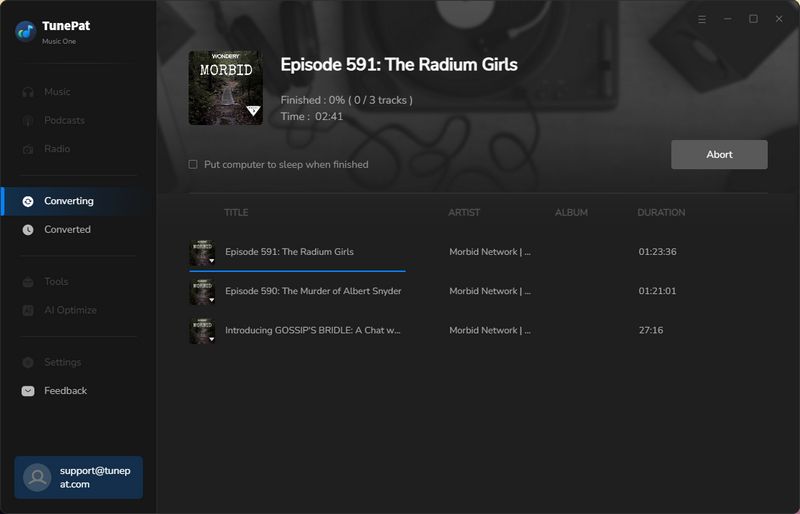
Whether you choose the Download icon or the Download All button, TunePat will show the parsed content in the pop-up window. You can uncheck the episodes you don't need, and choose "Add". On the next page, click the "Download" option to begin the conversion process. Please wait patiently, the download time depends on the length of the episodes. The download folder will be opened automatically when the download is finished.
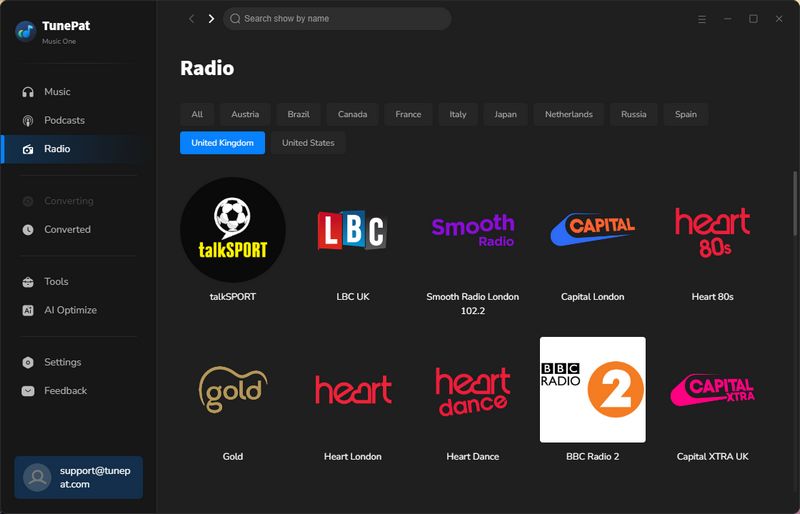
4. How to Record Radio for Free?
TunePat Music One also offers the ability to record Radio for free. Currently, it can support recording more than 500 popular radio programs, including BBC Radio, NPR, Classic FM, and more. You can play them online or export them as FLAC, MP3, AAC/M4A, AIFF, ALAC, or WAV to local files.
Step 1 Go to the Radio Module
Click the "Radio" tab from the left menu bar, then you can see a lot of radio programs are arranged here, you can sort and filter by country, or just search keywords to find what you want.
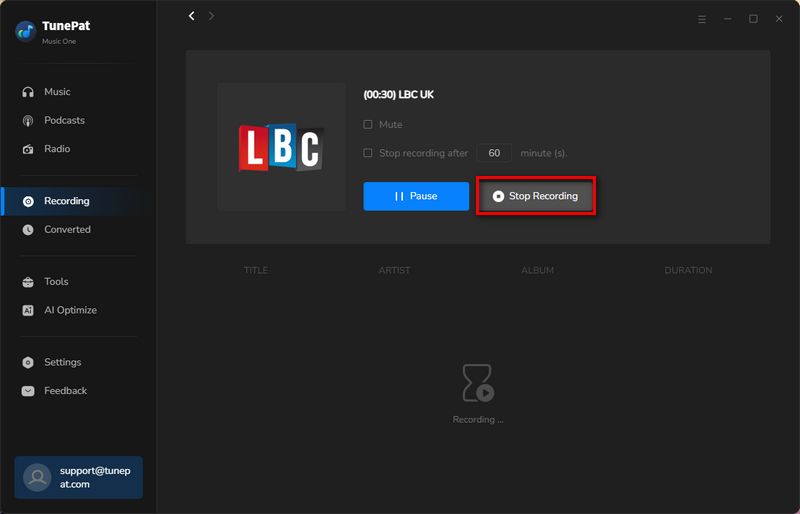
Step 2 Record the Radio & Save it on the Computer
Tap on any radio program you want to record, and then TunePat Music One will start parsing it automatically. After parsing, it will start playing automatically. Below the output settings you can customize, choose your preferred output format, quality, and output folder. Then click the "Click to Record" button to start recording.
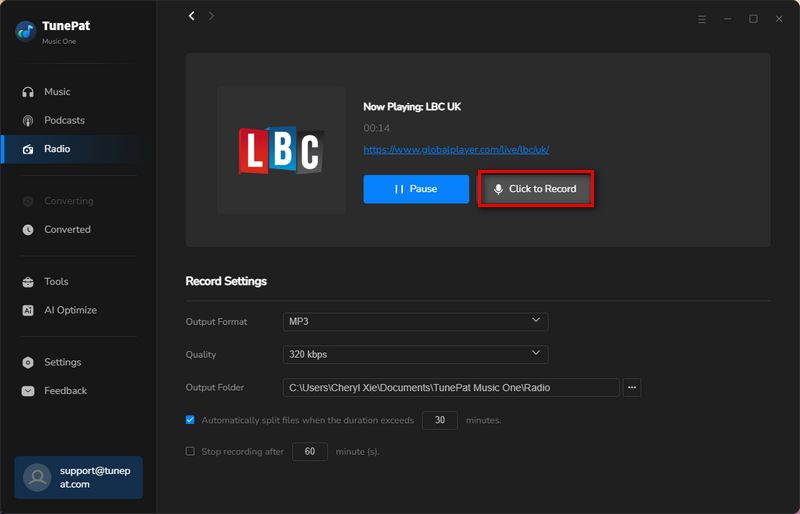
Step 3 Download Radio as MP3 or Other Common Formats
Randomly click "Stop Recording" to stop and get a new audio file. The file can be viewed on the current screen or by going to the "History" screen.