How to Transfer Amazon Music to Spotify
In today's age of rapid information delivery, the abundance of comparable services can make it challenging for users to select. This issue extends to music streaming services as well. It is common for customers to switch between streaming providers, whether it is in pursuit of better audio quality, a more straightforward and accessible interface, or due to financial constraints in seeking a free substitute. Amazon Music, a music streaming platform boasting a library of 100 million songs, is a prominent player in the market.
Recently, changes have been implemented in its Prime subscription package. Amazon Music Prime users are now limited to playing in shuffle mode by artist, album, or playlist. Additionally, they can only download the All-Access playlists offline. These changes have led to widespread dissatisfaction among users, who have since turned to online platforms in search of solutions. Furthermore, specific individuals have abandoned Amazon Music and switched to Spotify. Consequently, the primary obstacle they encounter is transferring their Amazon Music content to Spotify to prevent losing their meticulously crafted playlists. The present discourse presents a comprehensive manual on the steps to transfer Amazon Music playlists to Spotify, thereby facilitating their exit from their current predicament.

Part 1. The Best Way to Transfer Amazon Music to Spotify
Generally speaking, you can't move Amazon Music to other applications for use. All that exists on your device are some specially protected cache files. Not only that, although Spotify supports users to upload local music files to Spotify for playback, what you need to know is that this does not include specially protected files. You can upload MP3, WAV, or FLAC files to Spotify. To import and enjoy Amazon Music songs on Spotify, you first need to convert them to open-source audio formats such as MP3.
When you search online for how to transfer Amazon music to Spotify, you may see some recommendations, many of which are some traditional audio recorders that you need to play and record songs one by one. It is cumbersome to operate and has a high failure rate. Fortunately, reading this provides a solution. We recommend an audio converter that serves Amazon Music Prime or Unlimited subscribers. TunePat Amazon Music Converter is the flagship product and converts Amazon audio content at 10X conversion speed and saves it on the computer in MP3, AAC, WAV, FLAC, AIFF, or ALAC formats. This tool is perfect for those with numerous Amazon Music playlists to download. The software enables batch conversion of various playlists or albums, accurately preserving the original sound quality (HD or Ultra HD), ID3 tags, lyrics files, and other content of the songs.
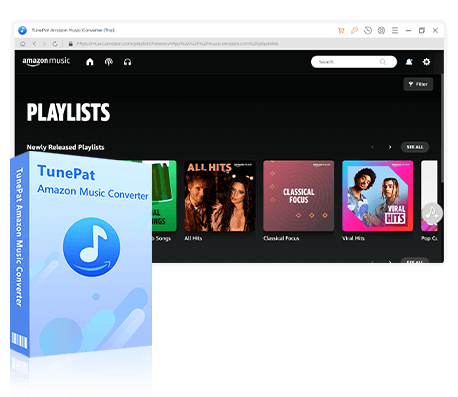
TunePat Amazon Music Converter
TunePat Amazon Music Converter lets users get Amazon Music tracks, albums, playlists, or podcasts with HD or Ultra HD audio quality kept.
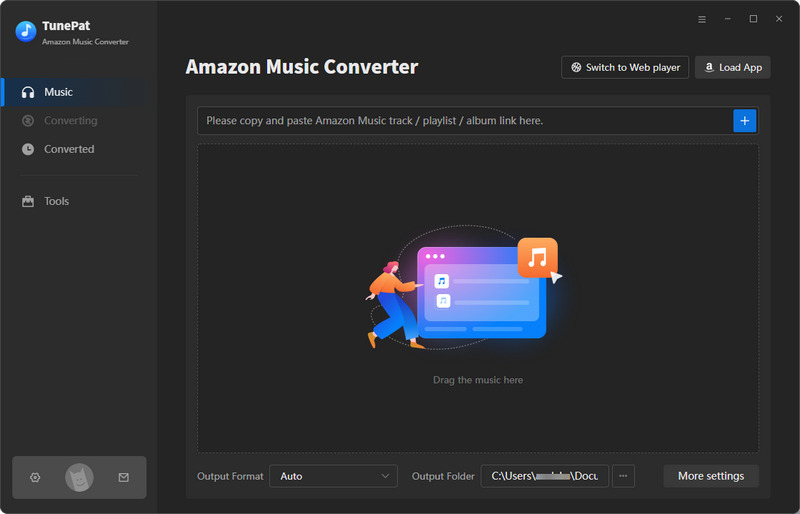
Step 1 Select Amazon Music from the App or the Web Player
Add Amazon Music from the APP: You can get audio files with the highest level of Ultra HD sound quality with up to 5x conversion speed.
The way to add songs is as follows: When you choose to get songs from the APP, the Amazon Music app on your computer will pop up. So you need to make sure you have the Amazon Music app installed on your computer and logged into your account. Then, in order to add the target songs to TunePat, you can drag and drop the desired songs directly to the specified location "Drag the music here" on the TunePat homepage, or you can copy and paste the URL of the song, album or playlist into TunePat. Then, click the "+" sign to parse.
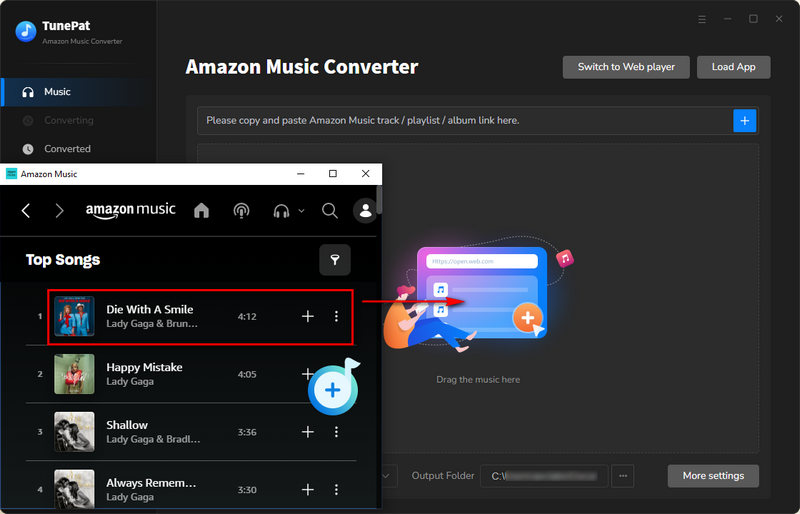
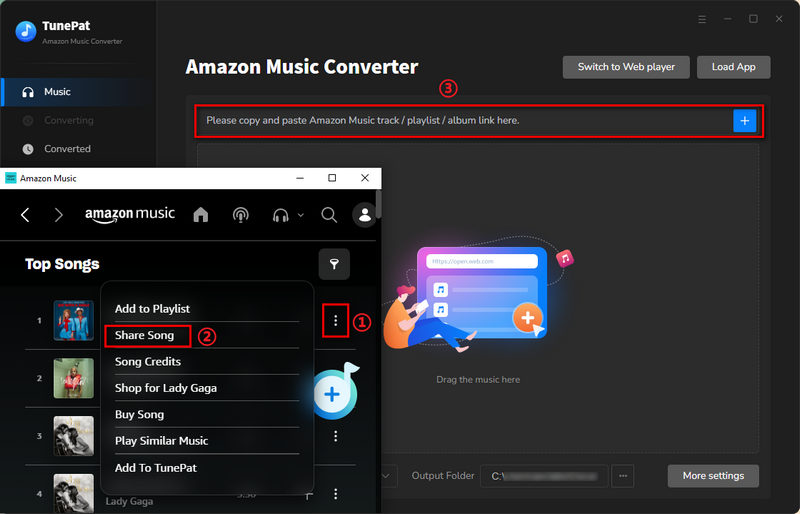
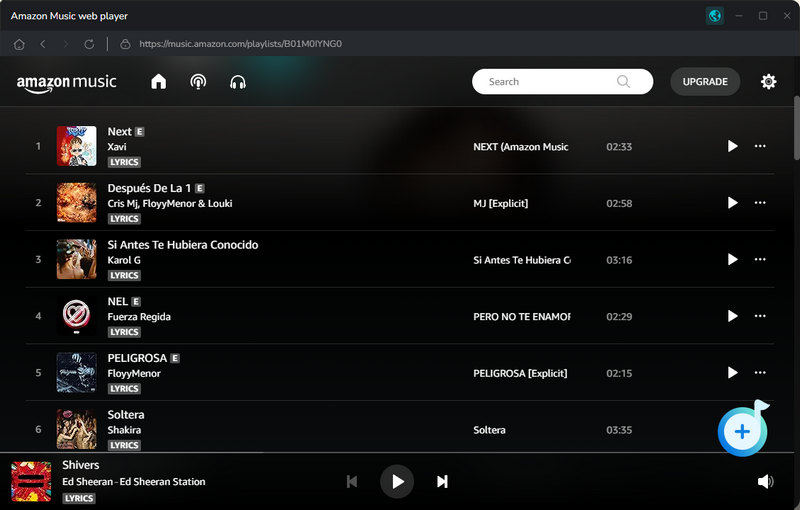
Add Amazon Music from the Web player: You can access the embedded web player directly without downloading the Amazon Music app. Then you can easily get the songs with 10X conversion speed, but the sound quality is limited to HD.
Here's how to add songs: Log in to your Amazon Music account in the embedded Amazon Music web player window. Search or open the content you want to convert and click the blue "Click to add" button. TunePat will identify the selected song.
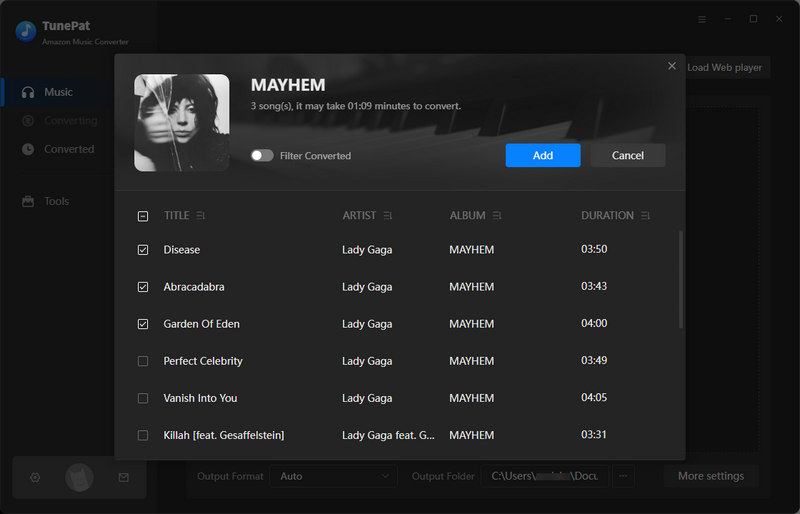
Step 2 Add Desired Amazon Music Tracks to TunePat
Once the reading is complete, the TunePat software presents a pop-up window listing all the content parsed from Amazon Music. By default, all titles are selected. If necessary, you can manually remove any unnecessary titles. Finally, click "Add" to include the selected content on the Home interface and initiate the conversion process.
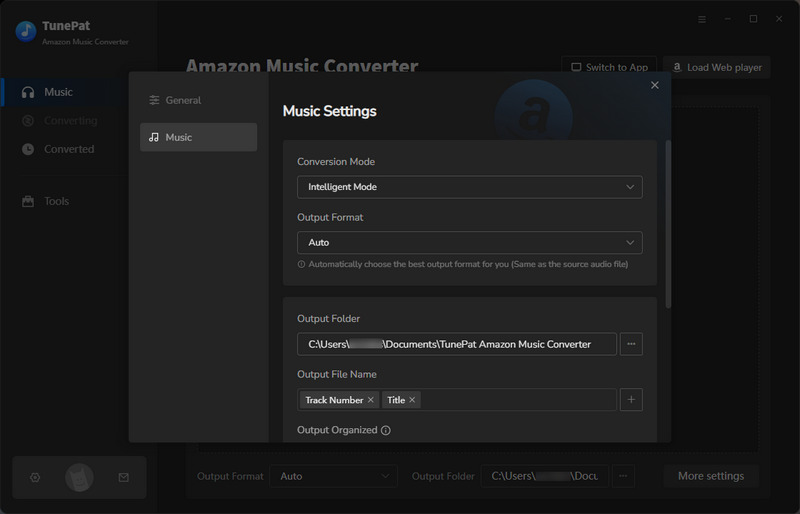
Step 3 Customize the Amazon Music Output Parameters
Before starting to convert Amazon Music, please go to the "Settings" interface first. Complete some necessary parameter changes here, including but not limited to conversion mode, output file format, output sound quality (bit rate and sample rate), output folder, output file name and other options. For the output format, please select MP3, WAV, or FLAC, which is compatible with Spotify.
Also, it is recommended to adjust the Conversion Mode to "Amazon Music Record" for optimal sound quality of the downloaded songs. For those wishing to preserve the original order of Amazon Music playlists, it is advised to modify the Output Organized option to "Playlist" and include the "Playlist Index" in the Output File Name field.
Step 4 Download the Selected Amazon Music to Your Computer
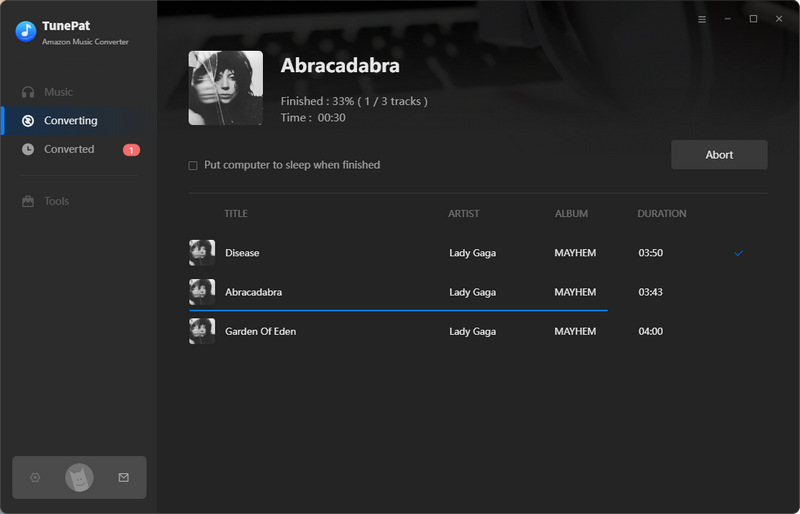
Click the "Convert" button on the interface to download all songs. Please wait patiently for the conversion to finish, as TunePat requires a short amount of time to convert your selected Amazon songs, albums, and playlists. Once the conversion is finished, you can go to the "Converted" panel to view or play all historical records,

Step 5 Transfer the Amazon Music Tracks to Spotify
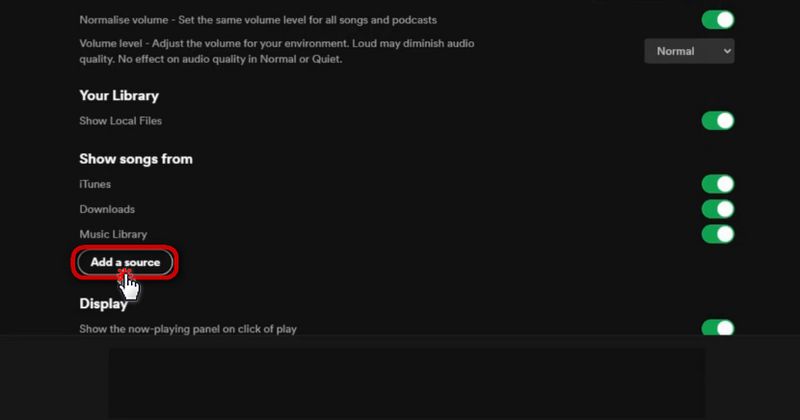
Now, run the Spotify app on your computer and log in to your Spotify account. Next, click on your profile icon at the top right and choose "Settings". Scroll all the way down until you see Your Library. From there, enable the button on the right-hand side labeled "Show Local Files". Various sources will then be displayed below. To add a new source, click on the "Add a source" button located below. Find the destination folder for the Amazon Music songs that have been converted and stored. Click "OK" to confirm. The songs will then be added to the Local Files folder in the Spotify library.
Part 2. Other Handy Tools to Move Amazon Music to Spotify
If you don't want to download a program, then you also have some options for completing the song transfer online. This type of tool allows users to transfer playlists across platforms. Once authorized and logged onto their respective websites, transferring songs is as simple as a click. Here we have picked out two of the best online sites for you, Soundiiz and TuneMyMusic.
Please be aware that this website functions by matching the Amazon music track with its corresponding Spotify version. Consequently, if the specific song/playlist you desire cannot be located on Spotify, the transfer will not be finalized. There are also additional drawbacks, such as the incapability to transfer playlists in their original sequence and the requirement to pay for batch transfers. Therefore, in this situation, it may be more advantageous to use the TunePat Amazon Music Converter discussed in Part 1.
Soundiiz
Soundiiz is a playlist converter that facilitates playlist transfers across music streaming platforms. It enables automatic synchronization and management of playlists on Amazon Music, Spotify, Deezer, Apple Music, Soundcloud, YouTube, Qobuz, Napster, Tidal, and more. To synchronize playlists, users must connect their accounts on all platforms through Soundiiz. The app will then display each platform's saved music in separate boxes on the main interface.
Step 1 Search and open the Soundiiz website. Click "Start for free" in the middle of the web page or the "Log in" button in the upper right corner of the navigation bar. If you don't have an account yet, you need to register one first. Then complete the login.
Step 2 Select "Amazon Music" to connect, then check the source playlists you want to transfer.
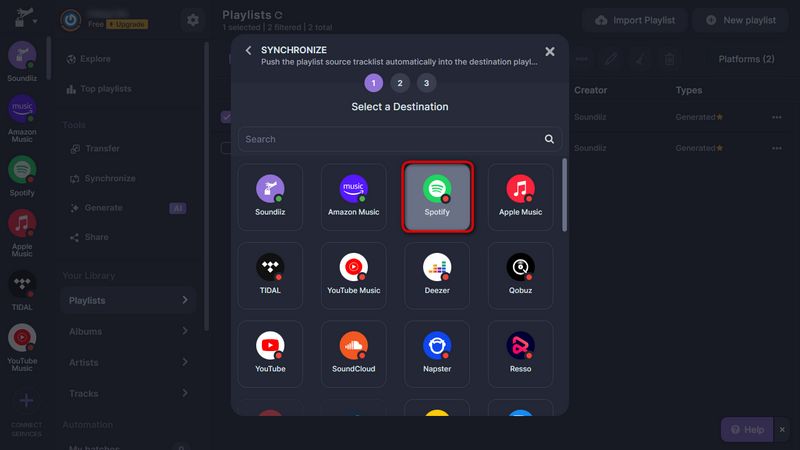
Step 3 Next, find the "Synchronize" option in the top menu bar, and then select "Spotify" in the pop-up recipient. Subsequently, finalize your authorized login for Spotify, after which you will be presented with all of your Spotify playlists. From here, you may choose to either save to an existing list or create a new one. After selecting, click the "Confirm and continue" option. Wait for the transfer to complete.
TuneMyMusic
When transferring a playlist between music platforms, consider using TuneMyMusic. This website enables seamless transfer of music libraries and playlists across a variety of services, such as Amazon Music, Spotify, Apple Music, YouTube, YouTube Music, Deezer, Tidal, SoundCloud, Qobuz, and TikTok Music.
Step 1 Navigate to the TuneMyMusic website and click the "Let's start" button.
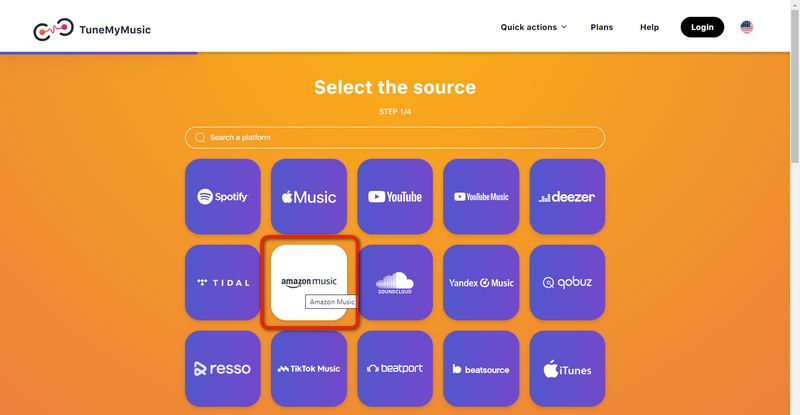
Step 2 Select "Amazon Music" as the source in the Select the source section, then log in to Amazon Music and click "Allow". After connecting to Amazon Music, all your playlists will be listed under From Your Amazon Account. Tick off the playlist or the songs you wish to transfer.
Step 3 Then select "Spotify" as the destination in the Choose Destination section. Then click "Start Moving My Music" to start moving them to Spotify.
Conclusion
This article presents three effective methods for transferring Amazon music to Spotify. Online platforms such as FreeYourMusic and Soundiiz enable the task to be done without requiring additional software installation. However, it's worth noting that TunePat Amazon Music Converter offers more comprehensive functionalities and an enhanced user experience.
With TunePat Amazon Music Converter, users can easily browse the entire Amazon Music library to select desired tracks for local download. The converted Amazon Music songs, which can be played offline on any media player, can also be transferred to Spotify playlists seamlessly. Additionally, you can choose to set the Amazon music as ringtones and even burn them to CDs. Users can continue to enjoy these features indefinitely.
