How to Burn Apple Music Songs to CD
There's something undeniably captivating about the ritual of placing a CD in a player, hearing the satisfying whir of the drive, and experiencing music in a format that goes beyond mere digital files. While streaming services offer convenience and vast music libraries, the allure of CDs lies in their superior sound quality, the tangible nature of physical media, and the nostalgic charm they evoke.
Today, we will address combining the extensive music library provided by modern streaming services with the benefits of CDs, resulting in an enhanced listening experience. Specifically, we will explore burning Apple Music songs to a CD. And we would provide a step-by-step guide on converting Apple Music to MP3 and then burn the local Apple Music downloads from a computer to a CD. Let's look down together!
Part 1. Can I Burn Apple Music to CD
Due to copyright protection, it is possible to create a CD of iTunes songs, but burning Apple Music songs directly to a CD is not allowed. There are two scenarios in which you can burn songs to a CD:
1. If you have purchased songs from the iTunes Store, you can burn them to a CD without any problems. These songs are usually in a compatible format for burning and can be played on any standard CD player.
2. If you have imported songs into iTunes from your personal collection or acquired them from other sources (provided they are not protected), you can also burn them to a CD.
However, Apple Music operates as a subscription-based streaming service that grants access to a vast library of songs. The songs you stream or download from Apple Music are protected by digital rights management (DRM) and are stored in AAC or ALAC formats, which prevent direct CD burning. DRM ensures that the songs can only be played within the Apple Music app and are not easily shared or distributed. Nevertheless, as an Apple Music subscriber, you have the option to download the songs and listen to them offline within the Apple Music app.
Part 2. All Things You Need to Burn Apple Music to CD
Put simply, if your intention is to create a CD of Apple Music tracks, you must initially convert the unique protected format of these songs into a standard, unrestricted audio format. This comprehensive procedure necessitates the utilization of the following tools:
CD/DVD Burner: Ensure your computer has a CD/DVD burner installed. Most modern computers come with built-in optical drives that can burn CDs. If your computer doesn't have one, you may need to purchase an external CD/DVD burner.
Blank CD-R or CD-RW: Obtain a blank CD-R (CD-Recordable) or CD-RW (CD-Rewritable) disc. CD-R discs can only be burned once, while CD-RW discs can be erased and re-used for multiple burning sessions.
Check CD Capacity: Before burning, ensure the total size of the selected audio files does not exceed the capacity of the blank CD (usually around 700 MB for standard CDs).
Local Audio Files: Ensure that you have the audio files you want to burn stored on your computer. These files can be in various formats, such as MP3, WAV, FLAC, AAC, etc. Check the burning software's supported formats to ensure compatibility.
Burning Software: You'll need burning software installed on your computer. Windows and Mac operating systems come with built-in burning tools. Alternatively, you can use third-party software like Nero Burning ROM, or other CD-burning applications.
If you're looking to convert and download Apple Music to a local file, your top option should be TunePat Apple Music Converter. It lets you easily convert Apple Music to MP3 and conveniently burn the converted files to a CD. The process is straightforward and efficient, saving you time.
Part 3. The Quickest Way to Download Apple Music Songs and Burn to CD
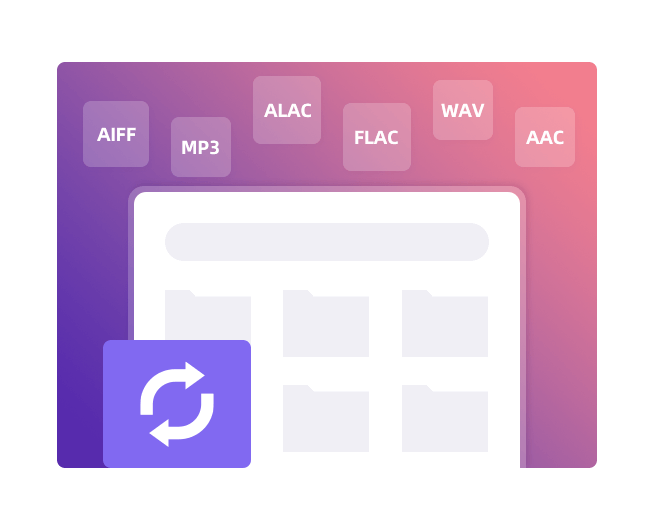
With TunePat Apple Music Converter, you have the ability to extract your preferred songs from Apple Music and store them locally in multiple formats like MP3, AAC, FLAC, WAC, AIFF, or ALAC. These files can be enjoyed offline without relying on your subscription status. This convenient tool is designed with user-friendliness in mind, offering a range of output settings, supporting fast tenfold conversion speed, batch conversion, and even enabling direct burning of converted Apple Music or other local audio files onto a CD, among other features.
TunePat Apple Music Converter
TunePat Apple Music Converter helps you download and convert all Apple Music songs and playlists to MP3 and other common formats.
Step 1 Log in to Your Apple ID
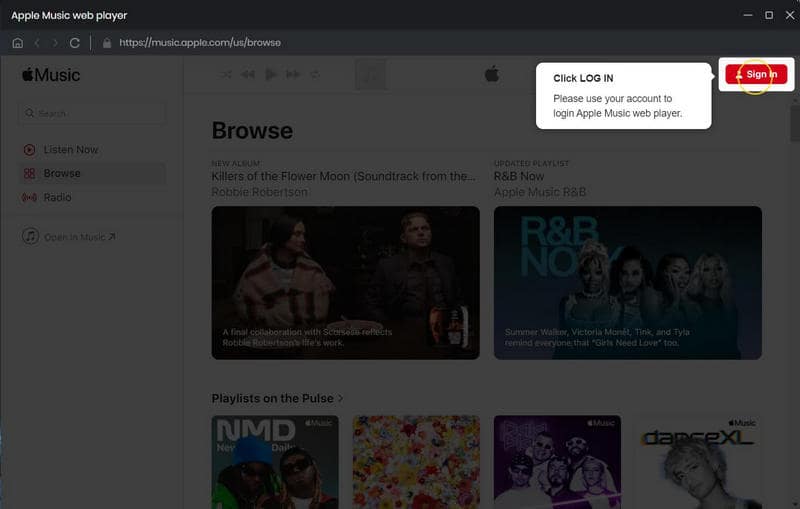
To begin, launch TunePat Apple Music Converter. Once opened, the Apple Music web player will immediately appear. If it doesn't show up, you can access it by clicking the "Open the webplayer window" button on the homepage. Then, carefully follow the on-screen instructions to sign in to your Apple ID.
Step 2 Set up the Output Parameters as Your Needs
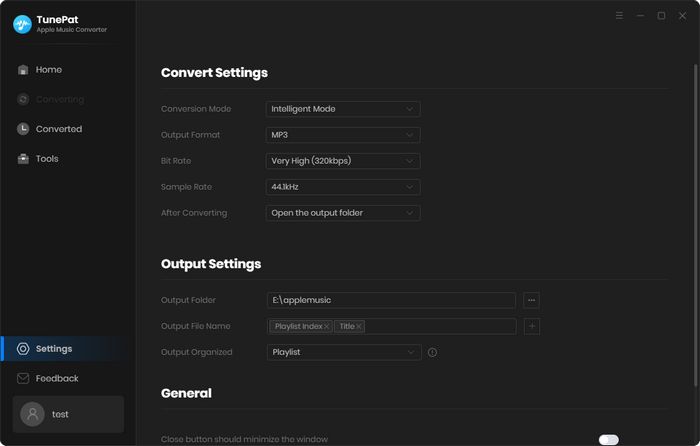
Next, locate the "Settings" icon located at the bottom left corner and click on it. This will allow you to customize various parameters. Regarding the output format, MP3 or AAC is more convenient to burn into a CD primarily due to the smaller file size and the ability to store a larger number of songs on a single disc. Here we select MP3 as an example.
You can change the following contents:
Step 3 Select Apple Music to Convert to MP3
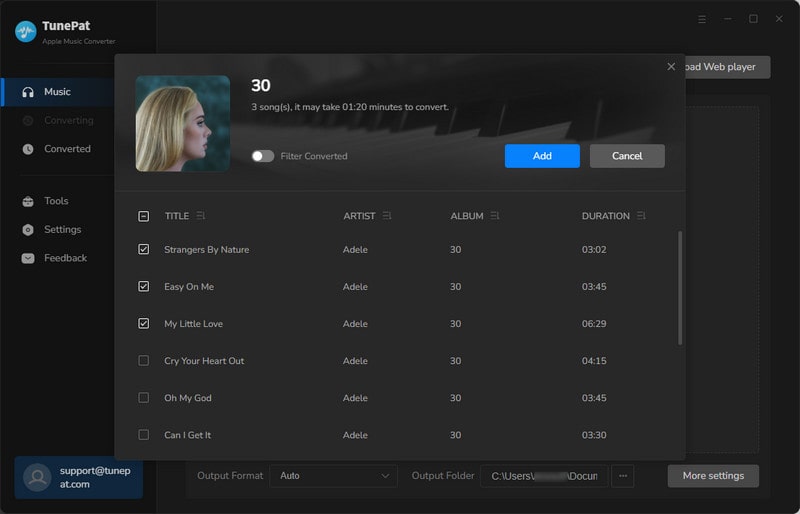
Now, choose a song, playlist, or album that you wish to download and click on the "Click to add" button located on the right side of the item. A pop-up window will appear displaying the titles of the items. Select the ones you want to download by ticking the checkboxes next to their titles. Then, click the "Add" option.
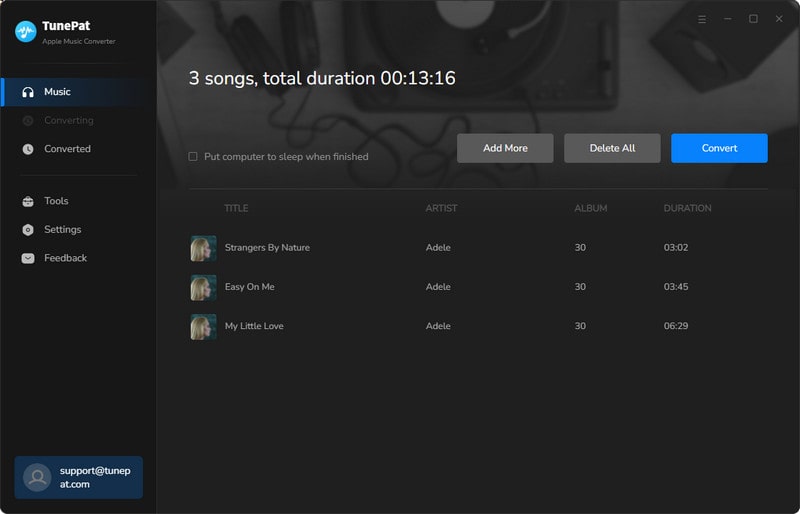
The selected songs will now be visible on the "Home" screen. If you want to add more items, click the "Add" button and repeat the process. To initiate the conversion process, click on the "Convert" button.
Step 4 View the Converted Apple Music
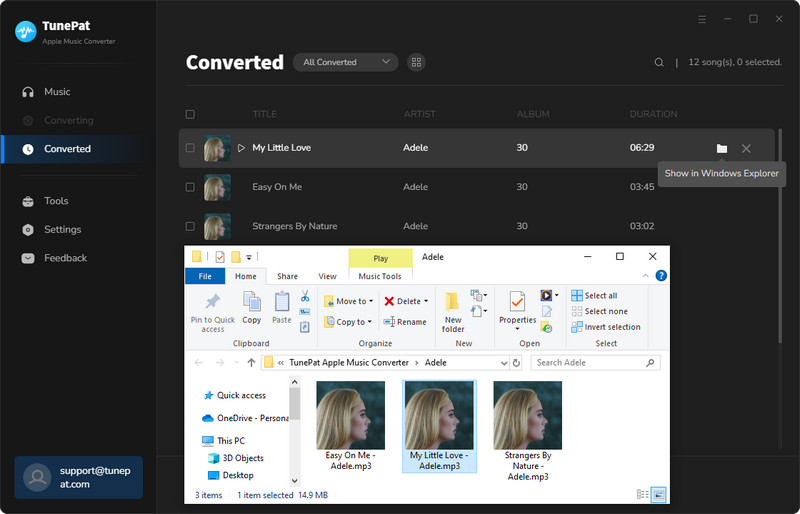
Once the conversion is complete, you can access your converted files in the "Converted" module. From there, you can browse and play the converted records. Additionally, you can easily locate the local folder where these converted files are stored and perform further operations on them.
Step 5 Burn Apple Music to CD
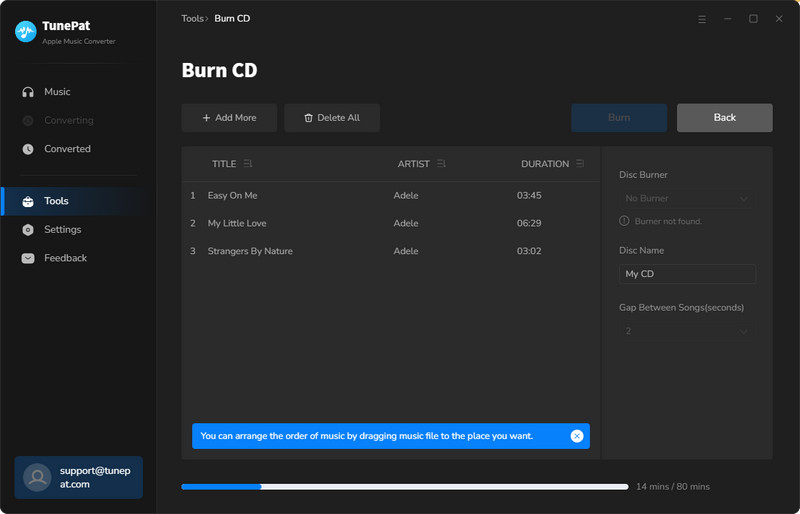
If you intend to burn these files to a CD, there is no need to use additional tools. Simply select all the converted items in the "Converted" module or manually choose the desired ones. Then, click the "![]() " icon located on the top menu bar and select the "Burn CD" option. TunePat Apple Music Converter will automatically switch to the Burn CD module in Tools. Insert a blank CD or DVD into your CD/DVD burner, and when ready to start the burning process, press the "Burn" button.
" icon located on the top menu bar and select the "Burn CD" option. TunePat Apple Music Converter will automatically switch to the Burn CD module in Tools. Insert a blank CD or DVD into your CD/DVD burner, and when ready to start the burning process, press the "Burn" button.
Part 4. Other Tools for Burning Local Audio Files to CDs
Here are some other free CD-burning programs, and we've covered how to use them:
Windows Media Player
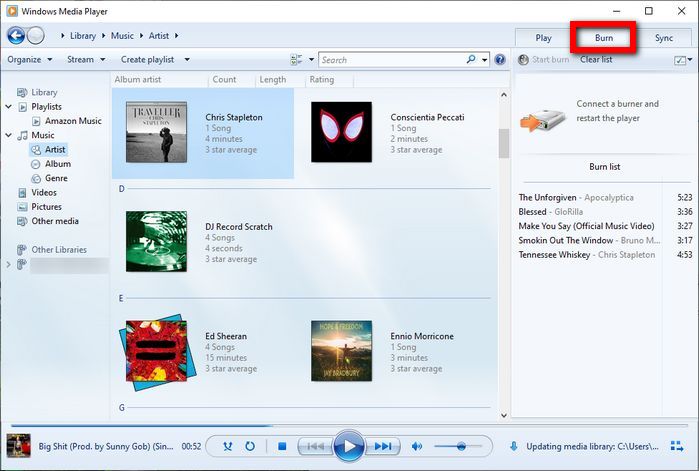
Windows Media Player is a built-in program on Windows computers that supports burning audio files to CDs. You can open Windows Media Player, create a playlist with your desired audio tracks, and then use the "Burn" feature to create an audio CD. The program guides you through the process, allowing you to customize settings like track order and disc title.
Step 1 Launch Windows Media Player and click on the "Burn" tab located at the top of the program.
Step 2 Create a playlist by dragging and dropping audio files into the burn list on the right side.
Step 3 Arrange the tracks in the desired order.
Step 4 Insert a blank CD into your CD/DVD drive.
Step 5 Click the "Start burn" button to begin the CD burning process.
ImgBurn
ImgBurn is a lightweight and versatile CD/DVD/Blu-ray burning software. It supports various audio formats and provides an easy-to-use interface for creating audio CDs. You can add audio files, arrange the tracks, and then burn them to a CD. To create a custom audio CD using ImgBurn, follow these steps:
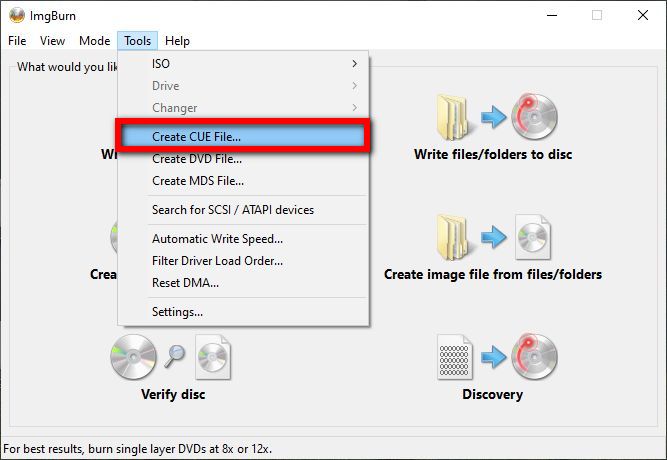
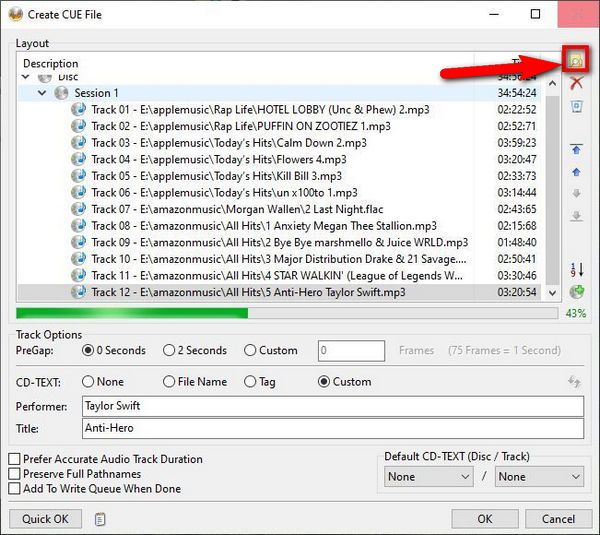
Step 1 Go to the Tools drop-down list and select "Create CUE File...". Click the browse button to select the target audio file from your local storage. Customize the options according to your preferences and click "OK" to save the file.
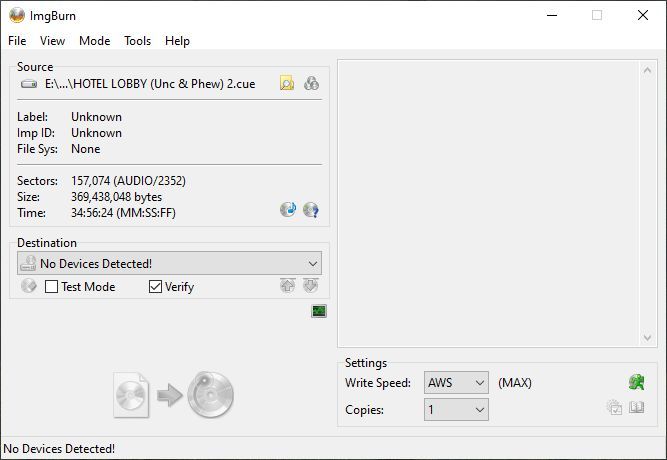
Step 2 Click the "Mode" button and choose "Ex-Mode Picker". In this interface, select the first module titled "Write image file to disc" and import the Cue file you generated in the previous step.
Step 3 Insert a blank CD into your CD/DVD drive. Make sure the destination is set to your CD/DVD drive. Click the "Burn" icon to initiate the CD-burning process.
VLC media player
VLC media player is a free and open-source media player that is widely utilized for playing various types of multimedia files. In addition to its primary function, VLC can also assist you in burning songs to a CD. The following guide will demonstrate the simple steps involved in using this software to burn the local Apple Music downloads onto a CD.
Step 1 To begin, launch VLC media player on your computer and ensure that a blank CD is inserted into the disc drive.
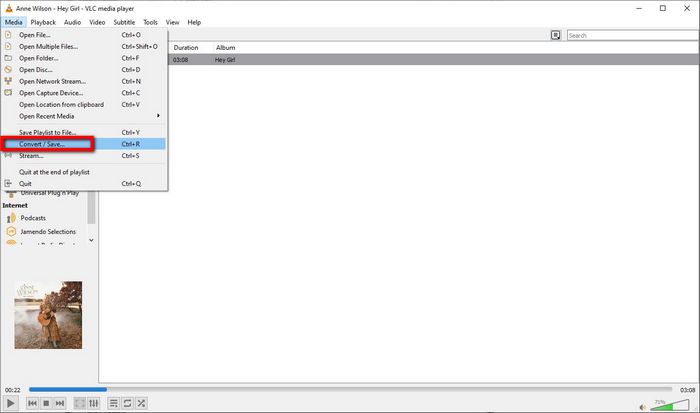
Step 2 Next, navigate to the Media menu and choose the "Convert/Save..." option. Alternatively, you can use the keyboard shortcut "Ctrl + R" to access the "Open Media" dialog box.
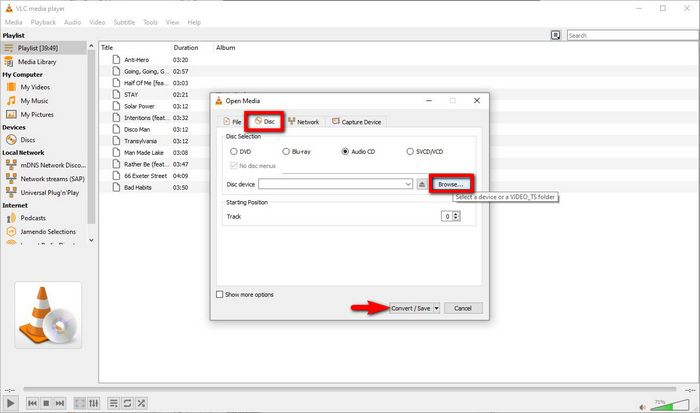
Step 3 Within the dialog box, switch to the Disk tab located at the top. Enable the Audio CD option by checking the corresponding box. Use the Browse button to select the CD drive. Finally, click on "Convert/Save".
Step 4 In the "Convert" dialog box, click on the Tool icon to open the options and select "Audio - MP3" as the preferred format.
Step 5 To add the folder containing your converted Apple Music, click on the "Browse" button. Once you have chosen the folder, you can proceed by clicking the "Start " button to initiate the process of burning Apple Music songs onto the CD.
Music (Mac)
The Apple Music app for Mac is a music streaming and library management application developed by Apple Inc. It provides features such as personalized playlists, recommendations, curated radio stations, and the ability to create and manage music libraries. Users can subscribe to Apple Music to access the full features, including offline listening, ad-free streaming, and exclusive content. The Apple Music app for Mac is integrated with the iTunes Store, enabling users to purchase and download songs, albums, and music videos. You can also use it to burn your songs to CD:
Step 1 Open the Music app and go to "File > New > Playlist". Alternatively, you can right-click the blank space in the left menu bar and select the "New Playlist" option.
Step 2 The new playlist will appear in the sidebar under Playlists. Give the playlist a name.
Step 3 To add converted Apple Music to the new playlist, drag and drop the desired items from your local folder to the playlist in the sidebar.
Step 4 The playlist will be updated with the songs you've added. Once everything is in place, insert a blank disc into your computer's disc drive.
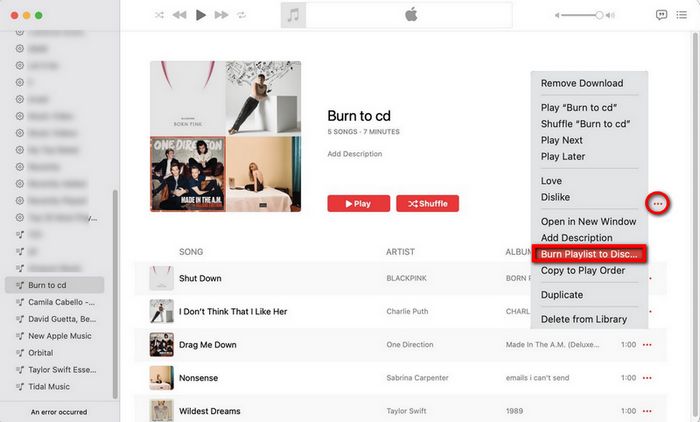
Step 5 Click on the icon with three dots in the upper right corner of the Music app. From the options that appear, choose "Burn Playlist to Disc...".
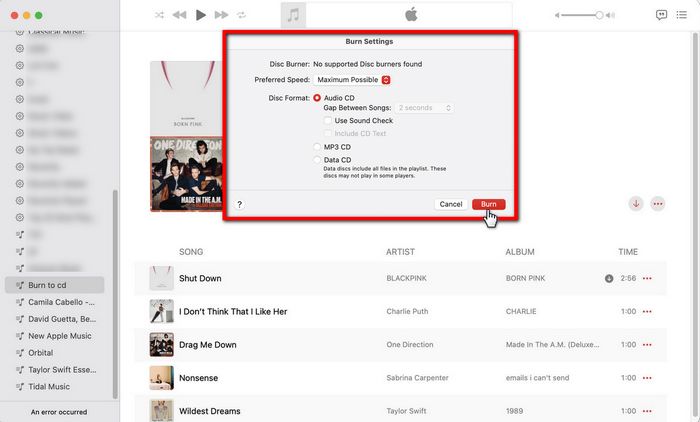
Step 6 Select the disc format, preferably an audio CD. You can also customize parameters like the recording speed and more.
Step 7 Click "Burn" to start the burning process. It may take several minutes to complete, so please be patient and wait for it to finish.
Conclusion
As outlined in this article, a wide array of computer tools are available for burning CDs, ranging from built-in programs on computers to free options and professional tools. To successfully burn Apple Music onto a CD, the crucial first step is to convert the Apple Music files into a common audio format. This is where TunePat Apple Music Converter proves to be a valuable and efficient solution, enabling you to effortlessly and swiftly obtain the Apple songs you desire while supporting multiple output formats.
With TunePat Apple Music Converter, you can easily get the Apple Music songs completed with ID3 tags. However, the benefits of this software do not end there. Notably, it also comes equipped with a free CD-burning tool, providing a comprehensive, all-in-one service for your music needs. Missing out on this one-stop service would be a regrettable choice.
Take action and download this remarkable software. From this moment onward, embrace the pleasure of listening to your Apple Music collection on CDs, bringing a new level of enjoyment to your musical experience.

