How to Cancel Tidal Subscription?
Tidal is a popular music streaming platform that offers an extensive library of 100 million songs, artist-curated playlists, and exclusive content behind the scenes. It is also known for providing CD (up to 1,411kbps) or Hi-Res (2,304 to 9,216 Kbps) quality audio for users who value audio quality highly. However, some users may find themselves reaching the end of their free trial or realizing that their Tidal subscription isn't meeting their expectations in terms of usage.
If you're looking to explore other music streaming options and want to cancel your Tidal subscription, this guide is here to help. In this comprehensive guide, we'll walk you through the step-by-step process of canceling your Tidal subscription, ensuring a smooth and stress-free experience and avoiding any unexpected charges. Whether you're switching to a different platform or simply taking a break, we've got you covered. Let's dive in and discover how to cancel your Tidal subscription effortlessly.
Part 1: How to Cancel Tidal Subscription on Website?
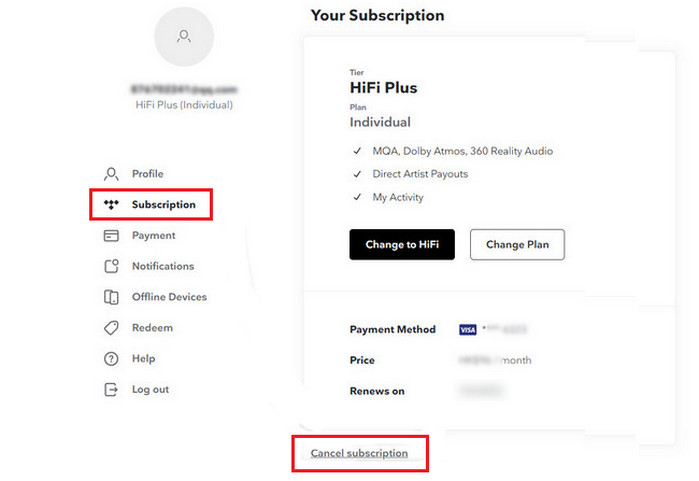
Cancelling Tidal's subscription directly from its official website is a straightforward way for users whether on PC or on mobile devices. If you didn't download the Tidal app or you deleted it on your device, this method is convenient to solve the problem. By following this process, you can easily end your Tidal subscription with two easy steps only.
Step 1 Go to https://account.tidal.com/ and sign in with your Tidal account.
Step 2 Scroll down and navigate to the "Subscription" section on the left hand. Click "Cancel subscription" and confirm cancellation.
Part 2: How to Cancel Tidal Subscription on Mobile Device?
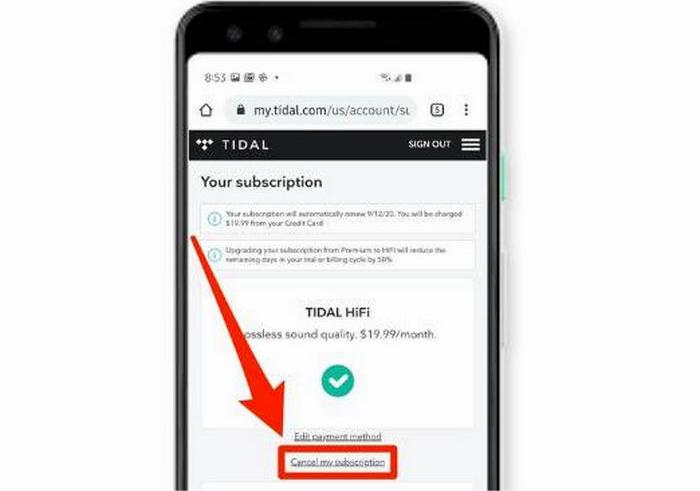
If you are used to playing Tidal Music on mobile devices like Android and iOS devices, this section will guide you to cancel the Tidal subscription in detail. Follow the steps below to navigate through the cancellation process and we will assist you in canceling your Tidal subscription effortlessly from your mobile device.
If you subscribed to Tidal directly from your Android device, please follow the four steps below to cancel your Tidal subscription.
For Android:
Step 1 Open the Tidal app, and click "My Collection" at the bottom right on your Android.
Step 2 Tap the "Settings" icon at the top right-hand corner.
Step 3 Click "Edit" then select the "Manage subscription" option.
Step 4 Scroll down, click "Subscription" and then click "Cancel subscription" to finish.
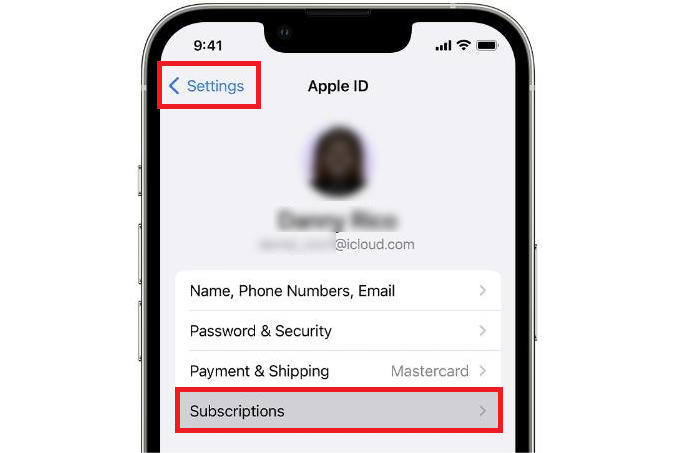
If you signed up for Tidal directly from your iPhone or iPad and your Apple Wallet displays an account, please follow the instructions below to cancel your Tidal subscription.
For iPhone/iPad:
Step 1 Open the "Settings" app, and tap your name > Subscriptions.
Step 2 Select your Tidal subscription and then click the "Cancel subscription" button.
Step 3 If there is no "Cancel subscription" button or you see an expiration message in red text, it means that the subscription is already canceled.
Note: If you cannot find an active subscription in your Apple Wallet, it indicates that you are being billed through a different payment method. You can find your receipt in your email by searching the words "receipt from Apple", and check which Apple ID was used on your receipt. To better verify the status of your Apple Account, please reach out to Apple Support for direct assistance.
There is also a way to unsubscribe to Tidal by using the cellphone mobile carrier. If your Tidal account is registered or paid through your cell phone provider, you can try this method. To stop a Tidal account from any mobile carrier, please contact the customer service department of your cell phone provider for assistance. Tell them that you want to cancel your Tidal subscription, and they will guide you through the cancellation process quickly.
Part 3: How to Cancel Tidal Subscription on Desktop?
If you have already downloaded the Tidal desktop app and keep using it on your computer, you can choose to cancel your Tidal subscription through its application by following just two easy steps.
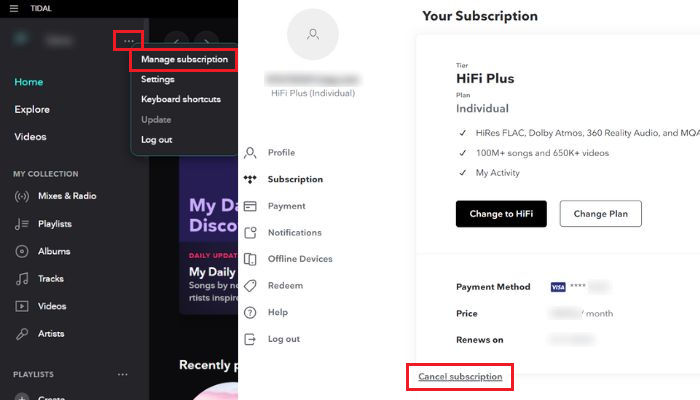
Step 1 Open the Tidal desktop app, click the three-dot icon at the upper right, and then select "Manage subscription".
Step 2 After that, the Tidal official website will pop up. Scroll down, click the "Cancel subscription" option, and confirm cancellation.
Part 4: How to Cancel Tidal Subscription on Roku?
For some people who may explore other options that better suit their music streaming needs like Apple Music on Roku, here comes the tutorial to unsubscribe Tidal on Roku TV.
Step 1 Press the "Home" button on your Roku remote, head over to the Tidal app and then tap the "asterisk" button.
Step 2 Select "Manage subscription" > "Cancel subscription" and confirm cancellation.
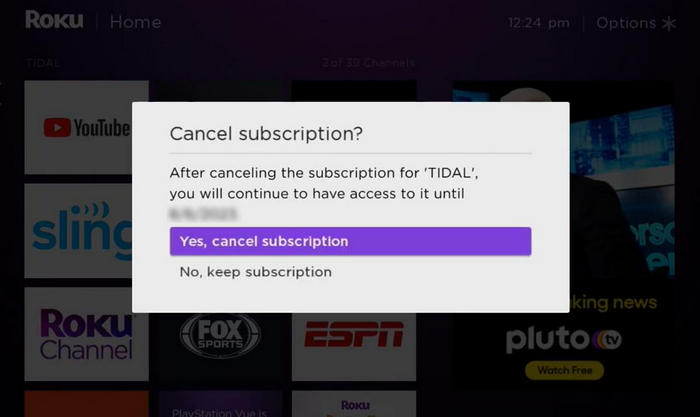
Note: If you purchased the Tidal subscription via any third-party service such as Roku TV, then you are not allowed to cancel the Tidal subscription via the Tidal official website or its app. In this case, you need to contact the target provider or go to the Settings app on your device to solve the problem.
Part 5: How to Play Tidal Music without Subscription?
After successfully canceling your Tidal subscription on your device with the guide above, please note that your account will remain active until the end of the current billing period. However, it's important to be aware that once your subscription is terminated, you are not allowed to download music from Tidal and the downloaded Tidal tracks you have saved on your device will no longer be playable.
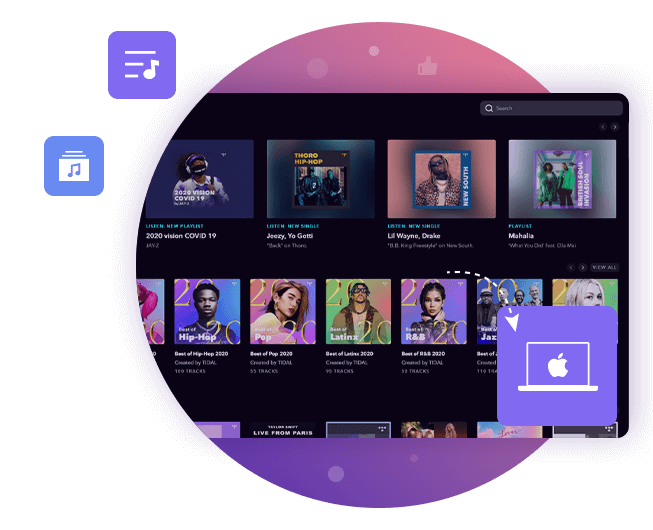
But don't worry! We have a solution for you. Try to use TunePat Tidal Media Downloader, a powerful tool that allows you to download audio from Tidal. With TunePat, you can enjoy your favorite Tidal tracks without a subscription or any limitations. It's worth mentioning that this program even supports downloading songs from Tidal retaining CD or Hi-Res sound quality at an impressive 10x conversion speed. Say goodbye to streaming restrictions and hello to offline listening pleasure with TunePat Tidal Media Downloader!
TunePat Tidal Media Downloader
TunePat Tidal Media Downloader lets users download all Tidal content to MP3 or other standard formats.
Step 1 Run TunePat and Choose a Conversion Mode.
To begin with, please install the TunePat Tidal Media Downloader and activate it. You will get an interface showing two conversion mode options and please simply select one of them.
Record from Tidal (App): Users have the option to acquire audio files of the highest sound quality, including up to Master quality, directly from the Tidal app. The conversion speed available in this mode is up to 5X.
Record from Tidal (Web player): This mode provides a conversion speed of up to 10X while preserving the HiFi sound quality. It eliminates the necessity of downloading additional applications. Instead, you can log in directly to your Tidal account using the embedded Tidal web player.

Step 2 Add Tidal Songs to TunePat's Conversion List.
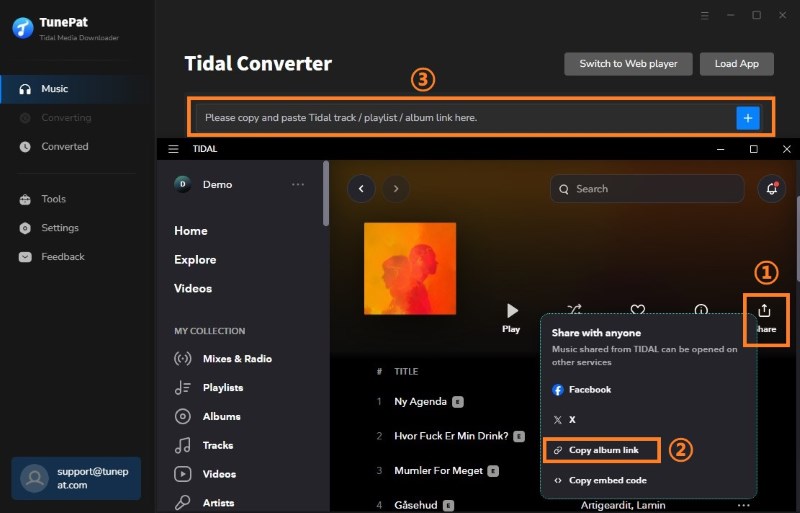
In the App Mode, there are two methods to add Tidal content for conversion. The first option is to drag and drop the desired tracks from the Tidal app onto the blue designated area on the TunePat home interface. Alternatively, you can copy and paste the link of the Tidal tracks you wish to convert into TunePat and click "+" for parsing. After parsing the link, the content will appear in a pop-up window, ready for further action.
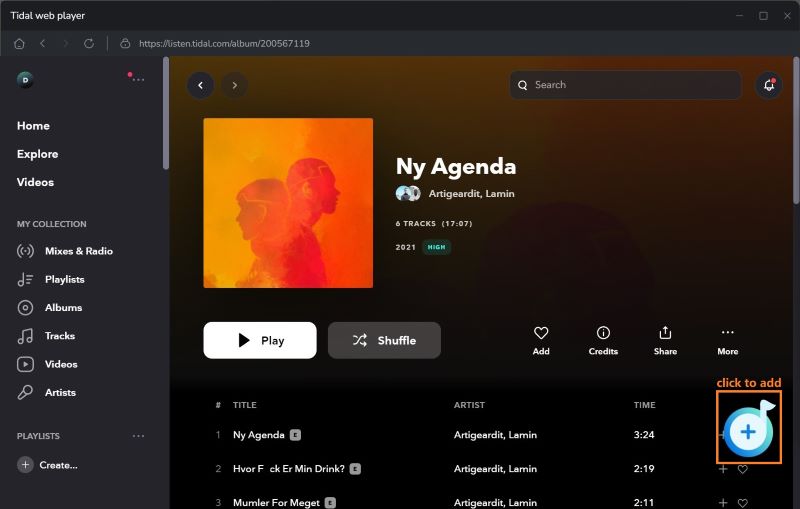
In the Webplayer Mode, the process differs slightly. First, find and select your desired songs in the Tidal web player. Next, locate the "Click to add" button situated in the lower right corner of the screen and tap it. After that, the current content on this page will appear in a pop-up window for further actions.
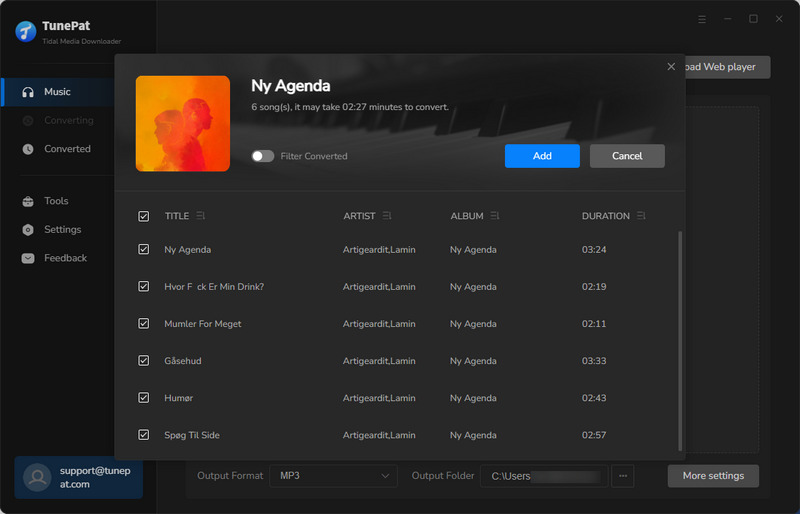
By default, all Tidal tracks in the pop-up window are automatically selected for conversion. If you want to exclude some specific songs, you can manually delete them from the conversion list. Once you have made your selection, simply click the "Add" button to initiate the conversion process.
Step 4 Complete the Output Settings of Tracks You Want to Download.
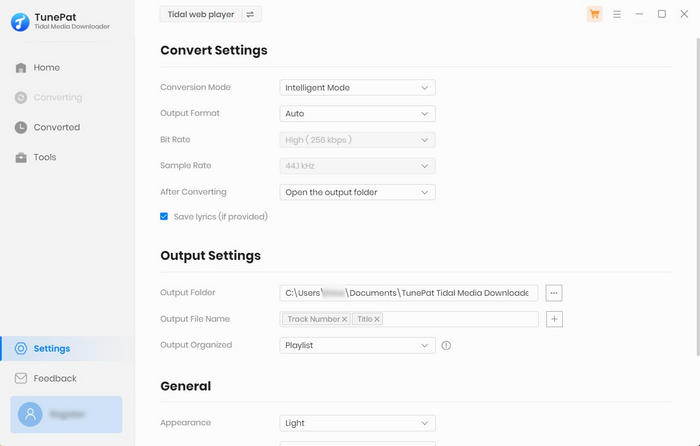
To customize your preferences, go to the "Settings" section and personalize various output options according to your needs. Users are allowed to adjust the conversion mode, output format, output sound quality, output path, and more.
There are some detailed settings for you to adjust as follows:
For preserving the highest sound quality of CD or Hi-Res audio, it is recommended to choose the "Auto" option so we select it as an example here.
Step 5 Convert the Selected Tidal Songs to PC.
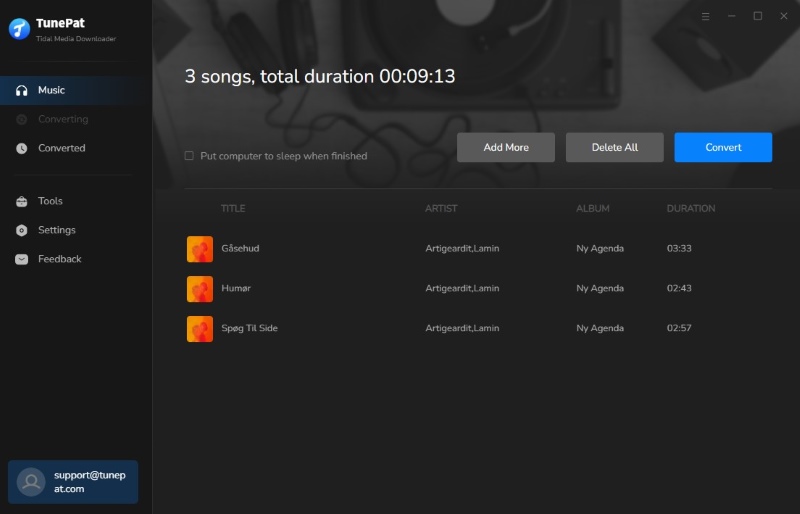
Once you have completed the settings, please return to the home page, and the adjustment will be automatically saved. If you wish to continue selecting music from other playlists or albums for a one-time conversion, simply click the "Add More" button on this page. Alternatively, you can click "Convert" to begin the conversion process immediately.
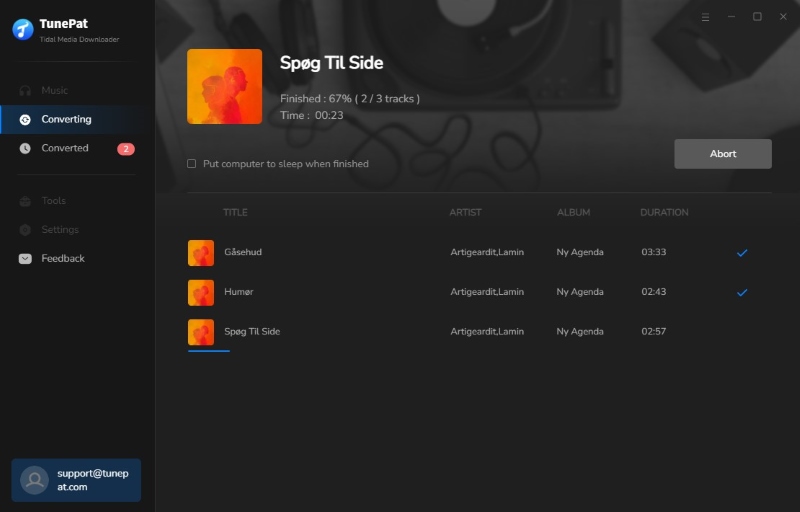
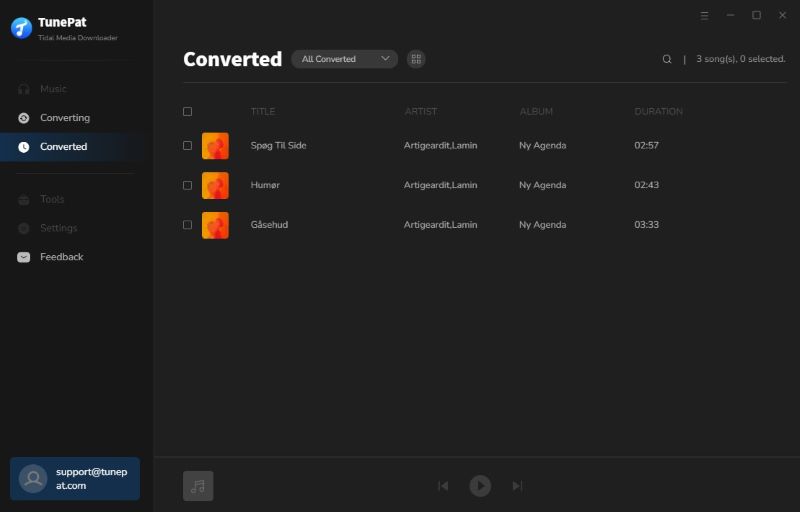
After the conversion is complete, the downloaded audio file will pop up automatically. If it doesn't open, you can also access the downloaded Tidal tracks by selecting the "Converted" section and clicking the file icon next to each track to activate the downloaded audio file. Now, you can double-click Tidal music downloads, use TunePat as a music player, and enjoy playing them without a subscription.
Conclusion
For those who are eager to cancel their Tidal subscription, this article shows how to do so on all devices using the official Tidal website, the Tidal app, or a third-party service. Select one way that suits you to solve your problem right now! If you are worried about losing your Tidal tracks after canceling the subscription, TunePat Tidal Media Downloader can assist you. It enables you to download Hi-Res Tidal music and store it locally for offline listening, eliminating the need for a costly subscription. With this magical tool, you can keep your Tidal music forever and enjoy offline playback anytime, anywhere. Click the Download button below and try it immediately!

