How to Set a Sleep Timer for Apple Music
Everyone has different bedtime habits. Some people turn off the lights and quietly fall asleep, while others like to turn on a warm night light before bed and read a few pages of an engaging novel. Some people prefer to take out their phones and listen to a few soothing songs they enjoy. For those who like to listen to music before sleep, the most important concern is whether the music can stop when it should achieve the best sleep-inducing effect without playing for too long and disrupting sleep. Thanks to the advanced era of technology, you don't have to worry about your songs playing all night or even until your phone runs out of battery and shuts down.
As one of the most popular streaming services, does Apple Music also have a sleep timer? The answer is definitely yes. This article is perfect if you want to know how to set a sleep timer on Apple Music. We will show you how to set up a sleep timer for Apple Music on iOS devices, Android phones, Macs, or Windows computers.
Part 1: Set a Sleep Timer for Apple Music on iPhones/iPads
Method 1: Using the Clock App
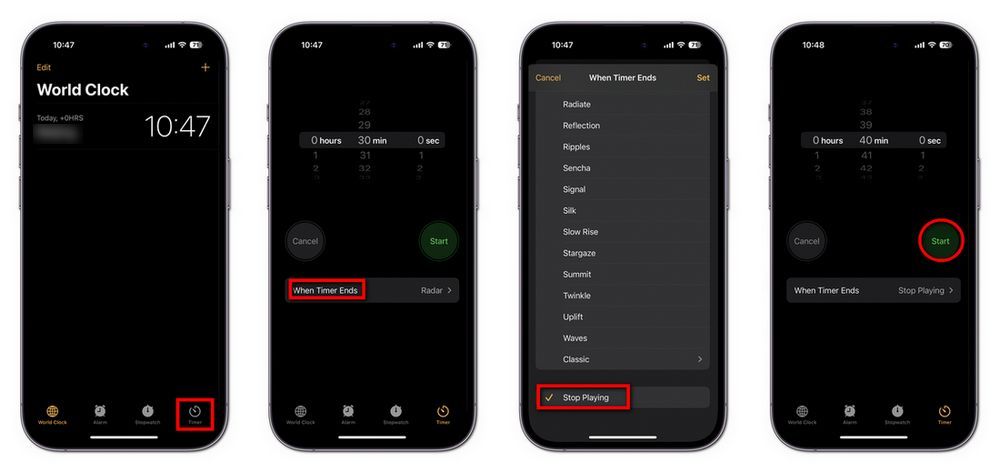
For iPhone users, setting a timer is very simple. It comes with the Clock app, which can be used not only for Apple Music but also when you're listening to songs on other platforms like Spotify, Amazon Music, and so on. The process is also straightforward. Please follow the steps below:
Step 1 Launch the Apple Music and start playing any music you want to fall asleep to.
Step 2 Open the Clock app and then tap on the "Timer" tab at the bottom.
Step 3 Set a time based on how long you want to listen to the music. Then tap on the "When Timer Ends" button below.
Step 4 Scroll all the way down and select the "Stop Playing" option, then tap on "Set" in the upper right corner to confirm.
Step 5 Now, tap "Start" to begin the sleep timer. You can now relax and enjoy your favorite Apple Music. The music will automatically stop at the specified time.
Method 2: Using the Shortcuts App
If you have a fixed nightly listening habit and don't want to manually set it every time, you can create an automation to have your music stop at a specific time every day or on weekdays. The steps may seem a bit lengthy, but once set up, you can enjoy it effortlessly:
Step 1 Open the Shortcuts app on your iPhone or iPad. Alternatively, you can swipe down on the home screen and use the search bar to find and open the app directly.
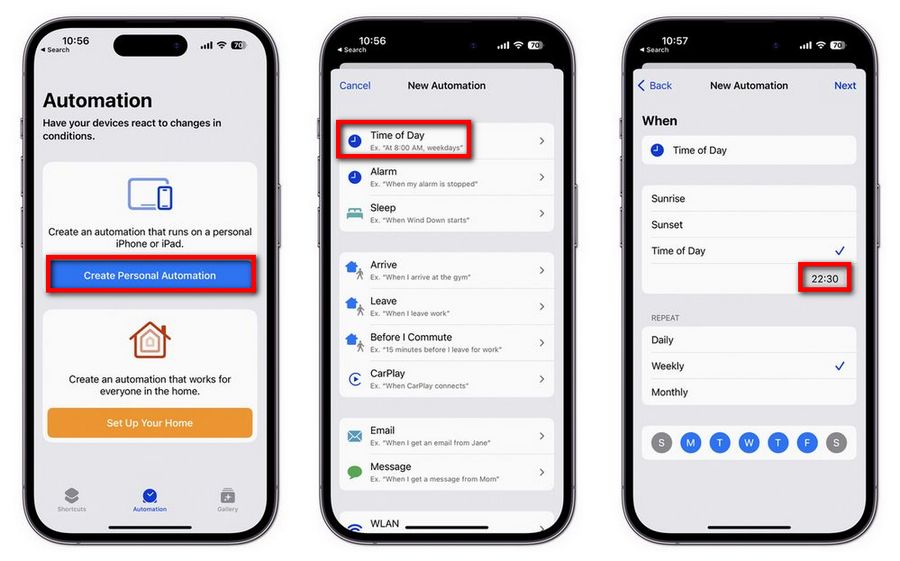
Step 2 Once open, click on the "Automation" module from inside, and then select the "Create Personal Automation" option.
Step 3 In the list, choose the "Time of Day" option. You can manually select a specific time. Additionally, you can set the days for this automation to take effect, either on a weekly or monthly basis. Once done, click "Next".
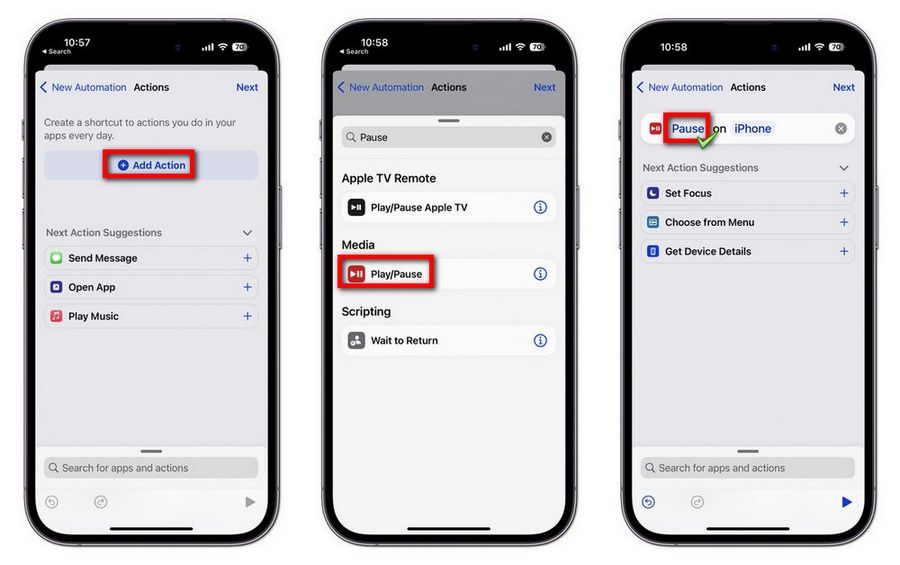
Step 4 Click "Add Action".
Step 5 In the search bar, type "Pause", then select "Play/Pause" from the search results.
Step 6 Click on "Play/Pause", and a dropdown menu will appear. From the menu, choose "Pause" to replace it. Click "Next".
Step 7 Scroll down and turn off the "Ask Before Running" button. Then click "Done".
You have now successfully set up the automation. Your music will automatically stop at the designated time. You can also delete this automation whenever you need to.
Part 2: Set a Sleep Timer for Apple Music on Androids
The Android version of Apple Music has incorporated the feature to set a sleep timer within the app, which resolves the issue faced by many Android users who previously had to seek third-party alternatives. Here's how you can set it up:
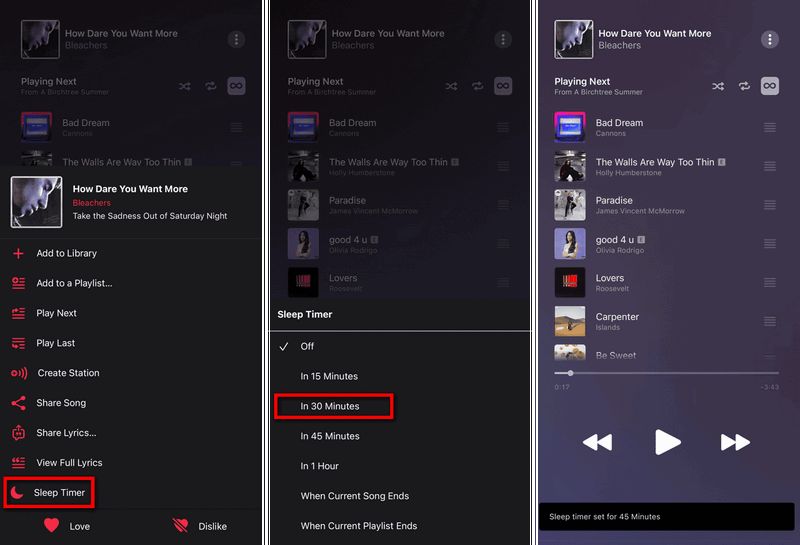
Step 1 First, open Apple Music on your Android phone, play a song, and click to enter the details page of that song.
Step 2 Next, tap on the vertical three-dot icon in the upper-right corner, and select "Sleep Timer" (represented by a moon icon).
Step 3 Several options will appear on the interface: "In 15 Minutes", "In 30 Minutes", "In 45 Minutes", "In 1 Hour", "When Current Song Ends", and "When Current Playlist Ends". Choose the duration you prefer. That's it! After setting the sleep timer in Apple Music, a small notification will appear at the bottom of the app. Apple Music will automatically stop playing songs after the designated time period.
Part 3: Set a Sleep Timer for Apple Music on a Mac
When you want to set a timer for Apple Music to stop playing on your Mac, you can utilize the built-in system feature. However, it's important to note that after making this setting, your entire computer will enter sleep mode while the application runs in the background. Here are the steps:
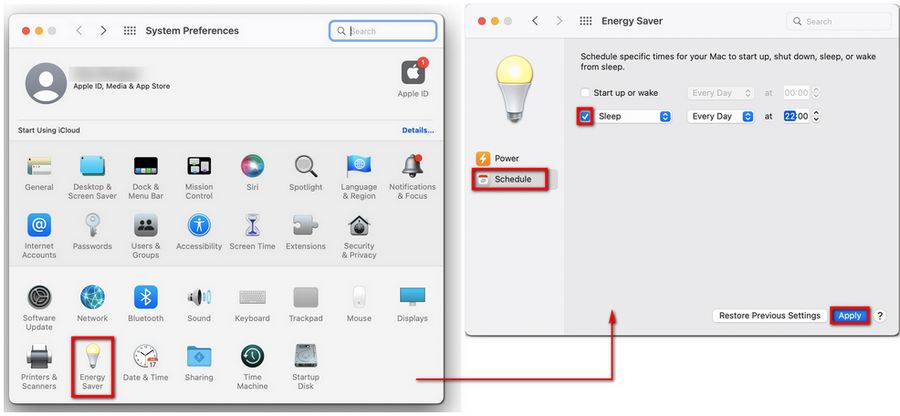
Step 1 Click on the Apple logo in the top-left corner, then select "System Preferences".
Step 2 Click on the "Energy Saver / Battery" button.
Step 3 Click on the "Schedule" option in the bottom-right corner of the interface.
Step 4 Select "Sleep". Set the desired time and click "Apply".
Note: Please take note that Mac will enter sleep mode 10 minutes after the scheduled time. This 10-minute delay in activating sleep mode is a smart precaution by Mac to make sure you didn't accidentally intend to put it to sleep.
Part 4: Set a Sleep Timer for Apple Music on a Windows Computer
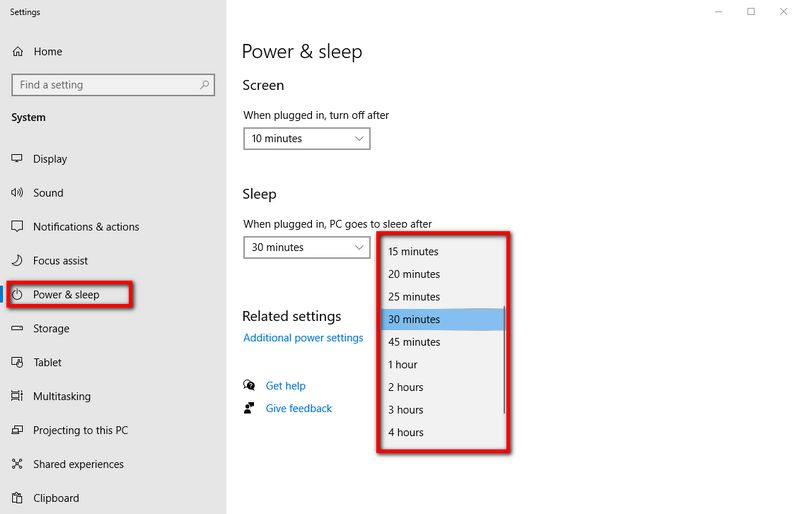
Similarly to Mac users, Windows users need to manually set their computer to sleep in order for Apple Music to stop playing automatically. Now, let's go through the steps for configuring a sleep timer on Windows for Apple Music.
Navigate to "Settings -> System -> Power & sleep -> Sleep". From there, establish the desired duration, and you're all set.
Part 5: Download Apple Music and Create Your Own Sleep Playlist
In addition to the methods mentioned above, we can also utilize a reliable tool to download favorite music, playlists, podcasts, or audiobooks from Apple Music to our local device. From there, we can directly create a personalized sleep playlist. This way, you not only have clever control over the content being played, but you can also precisely manage the duration by adjusting the number of songs. After downloading from Apple Music, you won't need to rely on streaming to play them. You can enjoy Apple Music smoothly, even in airplane mode.
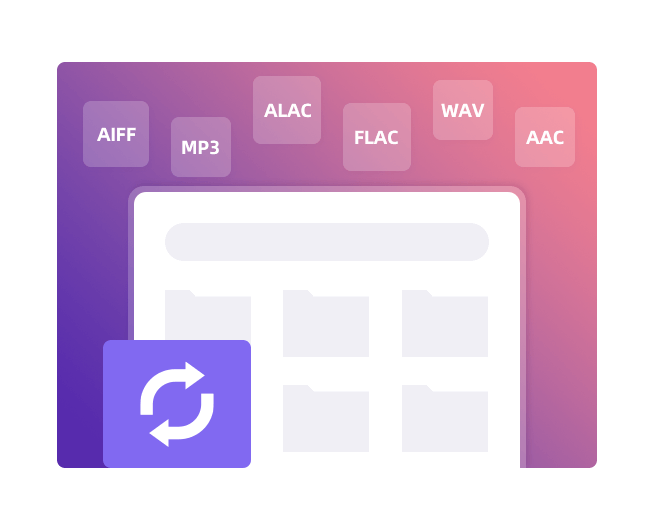
The Apple Music content obtained through offline playback is temporary files, only intended for use in the Music app or iTunes. So, if you're looking for a tool that can provide you with actual files from Apple Music, you should consider using TunePat Apple Music Converter. This tool perfectly helps you obtain high-quality Apple Music content. TunePat Apple Music Converter is an all-in-one converter offering two modes to acquire content from iTunes and Apple Music web player. You can get Apple Music in MP3, AAC, FLAC, WAV, AIFF, or ALAC formats. Furthermore, this converter can preserve ID3 tags and lyric information. Next, let's see how to use this converter.
TunePat Apple Music Converter
TunePat Apple Music Converter helps you download and convert all Apple Music songs and playlists to your local computer for offline listening.
Step 1 Choose One Conversion Mode
First, launch the TunePat Apple Music Converter. You will see two options on the main interface: "iTunes (App)" and "Apple Music (Web player) ". These two modes function differently, so choose the one you prefer.
Record from iTunes (App): It supports downloading Apple songs, podcasts, iTunes M4P music files, and Audible audiobooks from iTunes library. This mode offers Apple Hi-Res audio quality on the Mac version, while on the Windows version, it preserves the original quality at 10x speed.
Record from Apple Music (Web player): The Apple Music web player allows you to easily browse and download songs and podcasts in their original quality at 10x conversion speed without the need for installing any additional apps, including iTunes.

Step 2 Add Apple Music/ iTunes M4P Music to TunePat
When you select different conversion modes, the way you add songs to TunePat differs as well:
If you choose the iTunes (App) mode, you will see a "+ Add" button on the Home interface. Clicking this button will bring up a pop-up window that is arranged and displays content consistent with your iTunes. Select the titles you want to convert and click "OK".
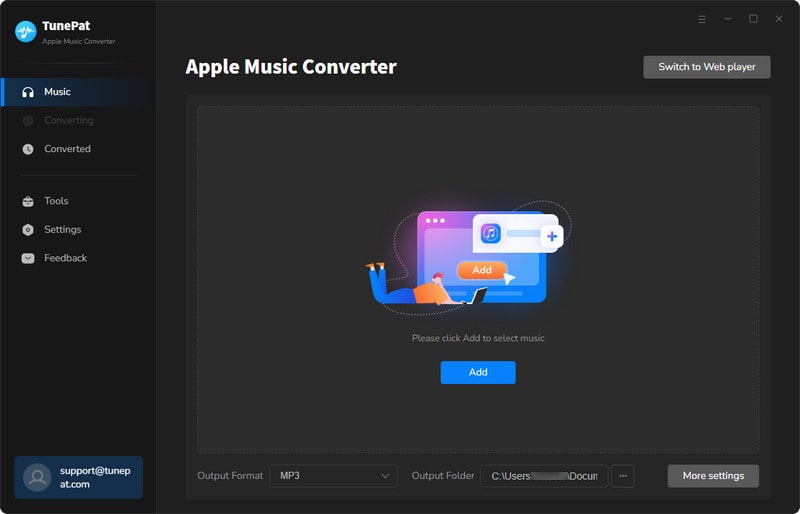
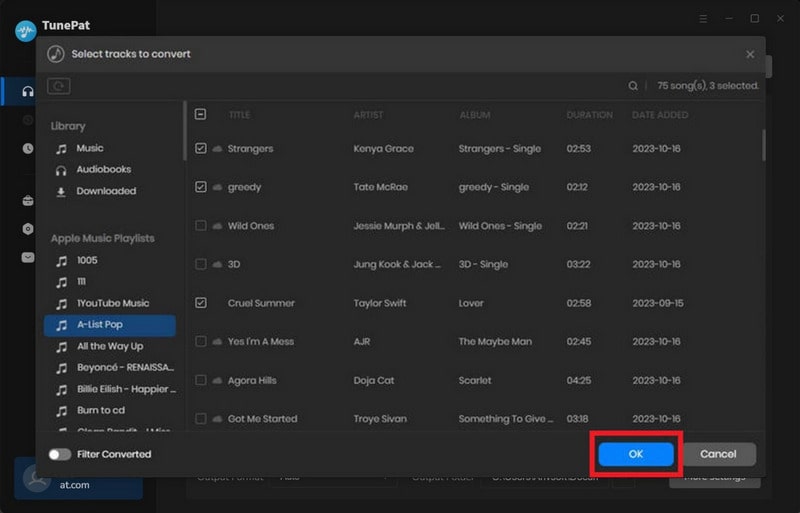
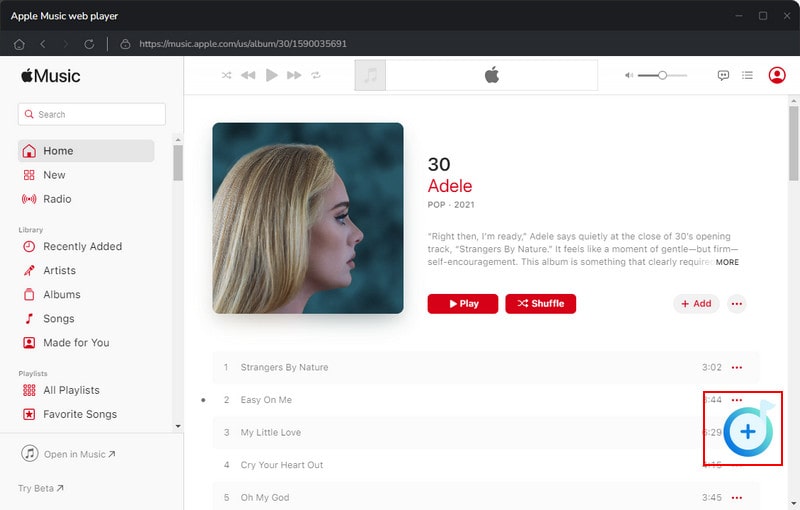
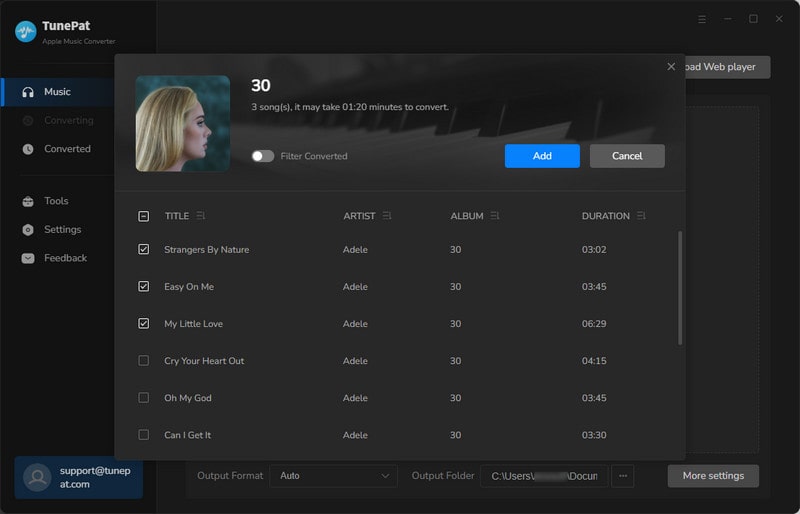
When you choose the Apple Music (Web player) mode, you need to log in with your Apple ID directly in the embedded web player and open the content you want to convert. You will see a blue "Click to add" button. Click it. Then, in the pop-up window, tick the titles you want to convert and click the "Add" button to add these songs to the conversion list.
Step 3 Set up the Output Parameters
Next, go to the "Settings" option in the bottom left corner. Here, you can customize conversion mode, output quality, output folder, and more. You can freely combine ID3 tags to name the output files and even sort downloaded Apple Music songs by artist, album, or playlist.
For the best quality Apple Music, it is recommended to choose iTunes Record (Application mode) and Web Download (Web player mode). As for the format, the default "Auto" is recommended to ensure that the music maintains consistent parameters with the source files. Once done, return to the Home interface.

Step 4 Download Apple Music Songs to Your Computer
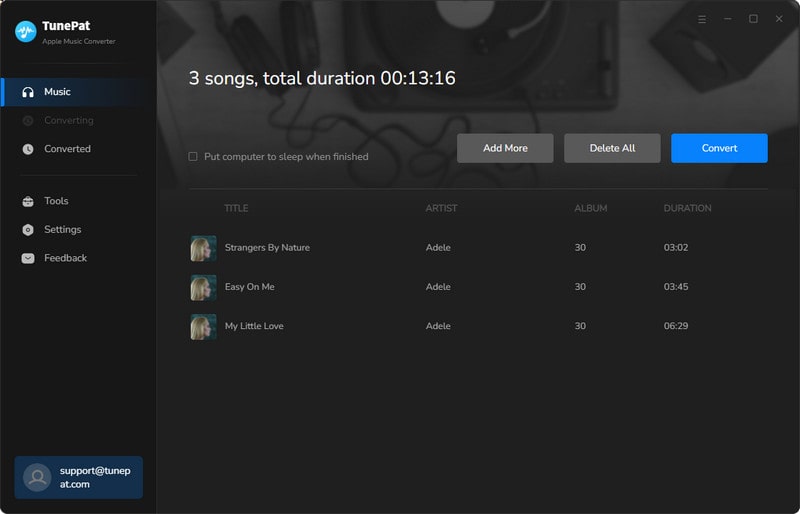
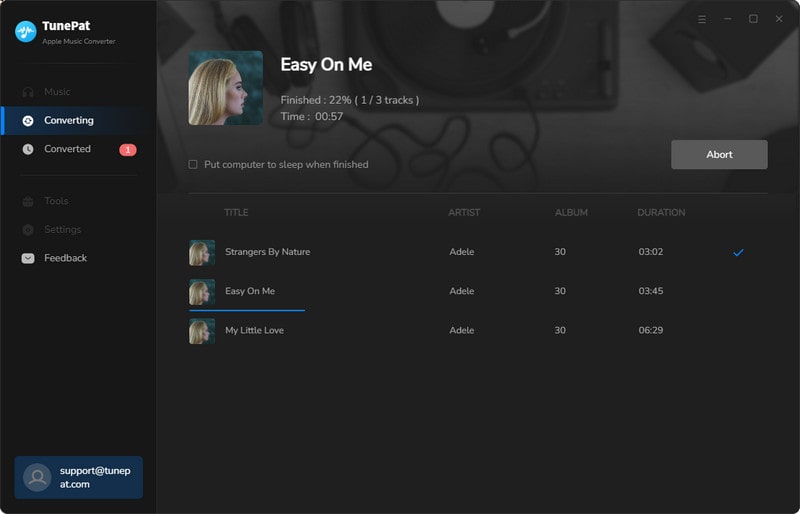
You can click the "Convert" button to download all selected Apple Music to your computer. If you wish to get more songs from other albums or playlists for one-time conversion, click the "Add More" option instead. Then, be patient and wait for the process to complete.
Step 5 Play Your Apple Music Sleep Playlist Offline
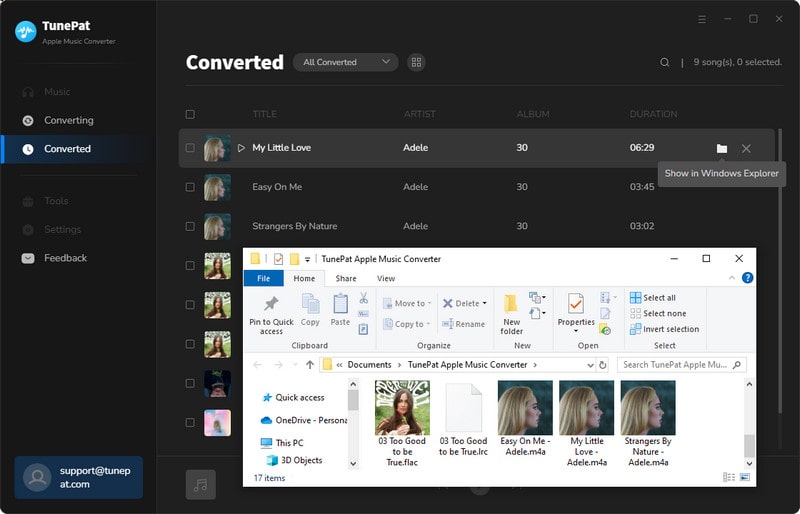
After conversion, the output folder will automatically pop up. You can also access the converted Apple Music under the "Converted" option. Now, you can import the entire folder into any music player on your computer or phone to play it as your special sleep playlist. The playback will stop automatically after all the songs have finished! You no longer need to set an additional sleep timer.
Conclusion
As one of the most popular music platforms worldwide, Apple Music is the primary choice for many to listen to music before sleep. Now that you've learned how to set a sleep timer for Apple Music on your phone or computer, you no longer have to worry about songs playing all night and can rest easy knowing you'll fall asleep peacefully.
Additionally, we recommend the method of downloading Apple Music to MP3 to create your own exclusive sleep playlist. With the powerful TunePat Apple Music Converter, you can download your favorite songs, playlists, albums, podcasts, and even audiobooks locally. Then, before going to bed, you can play this carefully curated sleep list separately. Moreover, you can permanently save these downloaded songs and freely share and transfer them. Click the button below to install this amazing tool right away!

