How to Fix Apple Music Not Available in Your Region
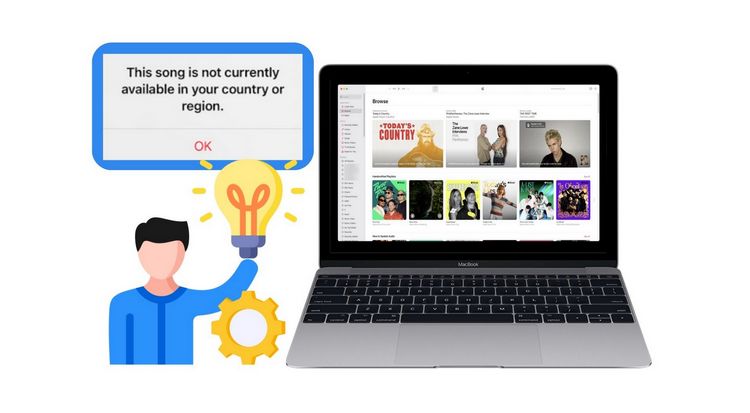
Apple Music has revolutionized how we consume music, offering a vast library at our fingertips, but the frustration of encountering songs unavailable in your region is not uncommon. This issue can stem from various factors, such as licensing restrictions or regional limitations Apple sets. This comprehensive guide will explore how to fix the issue of "This song is currently not available in this country or region" and provide an ultimate solution to address and overcome this problem forever by using an excellent third-party tool. Let's read on.
Part 1: Top 9 Methods to Fix Apple Music Not Available in Your Region
Method 1: Check Apple Music Server Status
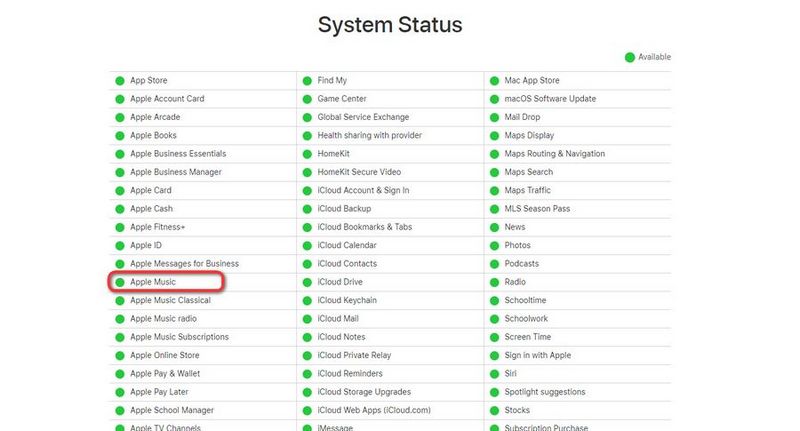
Before implementing a solution to address the problem of songs not playing on Apple Music in your region, it is advisable to check the status of the Apple Music server. Visit the website and verify whether the color next to the Apple Music option is green. In case it is not green, please wait until it turns green.
Method 2: Use a VPN (Virtual Private Network)
The music industry is governed by intricate licensing agreements that differ across regions. Certain songs may be restricted in specific areas due to legal obligations and contractual limitations. To access Apple Music in a location where the service is unavailable or while abroad, a VPN can be used to unblock it.
Employing a VPN is a powerful tool to circumvent regional restrictions. Here's a step-by-step guide:
Step 1 Subscribe to a reputable VPN service.
Step 2 Install and configure the VPN app on your device.
Step 3 Connect to a server in a region where the desired Apple Music content is available.
Step 4 Open Apple Music and check if the songs are now accessible.
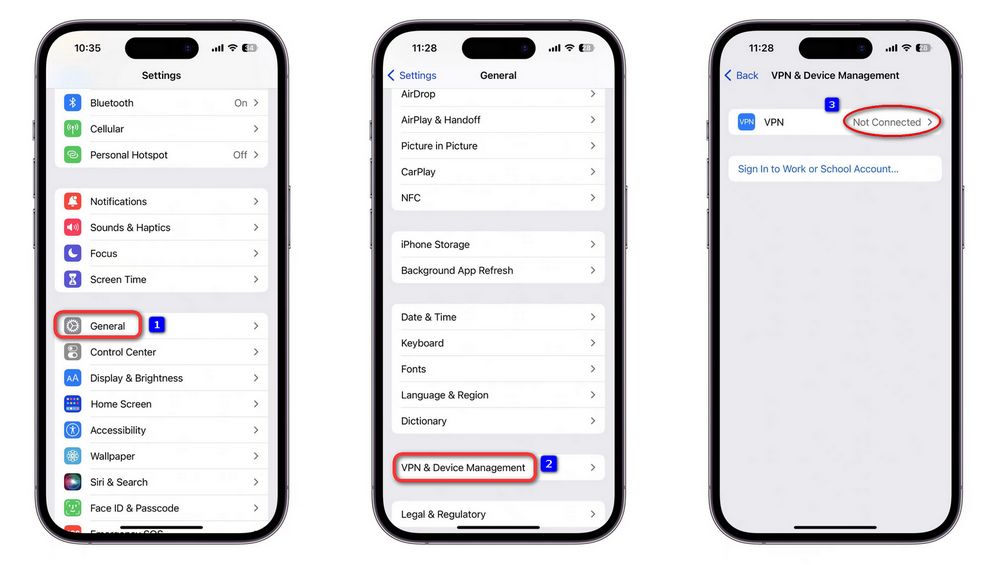
Sometimes, Apple Music may detect and block your access when you use a VPN or proxy server. To resolve this issue, disable the VPN or proxy server and connect to your local network to access Apple Music again. Here are the specific steps to follow:
Step 1 To begin, navigate to your iOS device's "Settings". Next, locate the "General" settings and proceed.
Step 2 From there, access "VPN & Device Management" to disable the VPN connection.
Step 3 Modify the VPN settings on the screen until "Not Connected" appears as an option.
Method 3: Update Apple Music and Your Device
Keeping both the Apple Music app and your device's operating system up to date is fundamental. Regular updates often include bug fixes and improvements that can address regional availability issues.
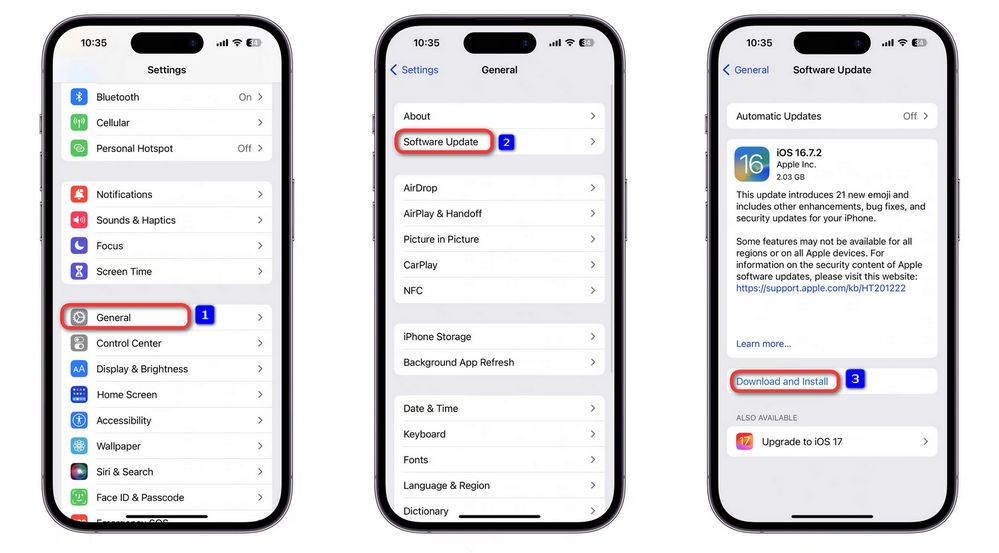
Step 1 Navigate to the "Settings" app and select "General".
Step 2 Tap on "Software Update" to check for updates on your iOS device.
Step 3 If updates are available, select "Download and Install", and agree to the terms and conditions before starting the download process.
Method 4: Change your Apple ID Country or Region
Change your Apple ID location when traveling internationally for business or tourism. Ensure your Apple ID region matches your actual location to avoid restricted content access. Additionally, make sure your location is supported by Apple Music.
Special Note: Prior to updating your location, you must utilize any remaining store credit, terminate your subscription, and acquire a payment method compatible with the new country or region.
On an iPhone/iPad:
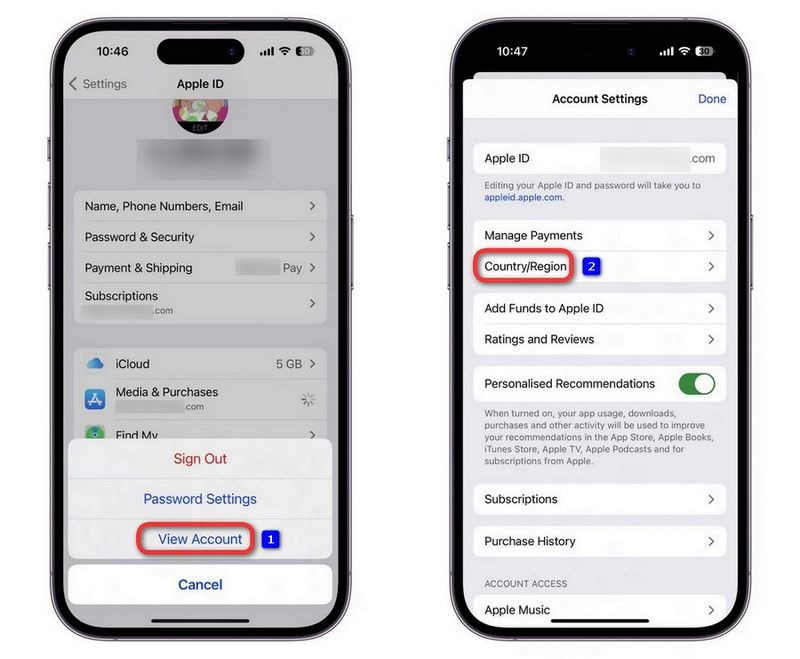
Step 1 Open the "Settings" app. Tap your name profile, then tap on the "Media & Purchases" option.
Step 2 Tap "View account", and you may be prompted to sign in. Then select "Country/Region".
Step 3 Choose the "Change Country or Region". Locate and select your new country or region, then review the Terms & Conditions.
Step 4 Tap "Agree" in the upper-right corner, then tap "Agree" again to confirm.
Step 5 Make sure to include your new payment information and billing address before tapping Next. You need to provide a valid payment method that is acceptable for your new country or region.
On a Mac or a Windows Computer:
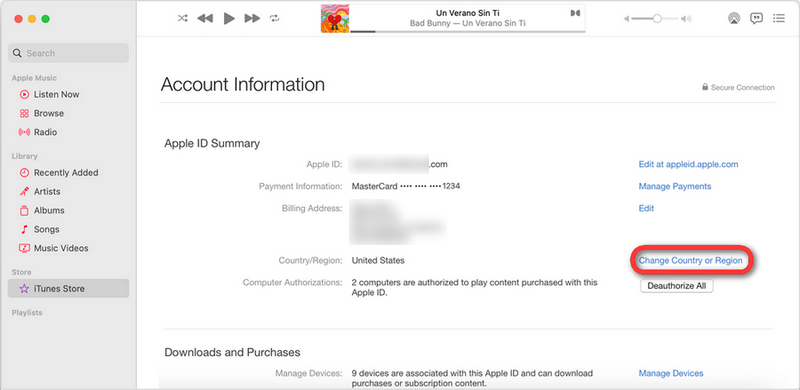
Step 1 Open the Music app or iTunes on your computer. In the top menu bar of the screen or iTunes window, select "Account", then choose "View My Account" or "Account Settings".
Step 2 Sign in using your Apple ID. Next, on the Account Information page, select "Change Country or Region" and pick your new region or country.
Step 3 Review the terms and conditions, then accept by clicking Agree. Confirm your agreement by clicking Agree again.
Step 4 Enter your updated payment details and billing address, and then select the "Continue" option.
Method 5: Reset the iTunes/Music App System Warning
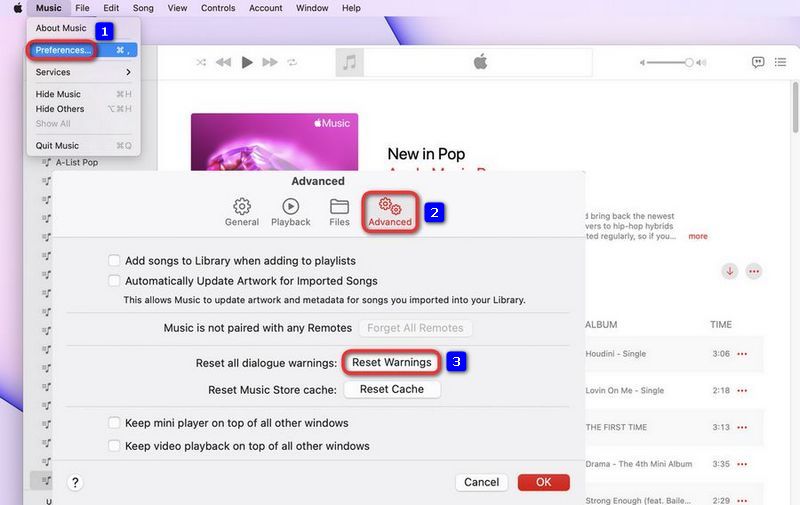
Numerous users have reported that resetting the System Warning within the Apple Music app may effectively address the problem of unavailability in playback. Engaging in this action has the potential to rectify the issue by eliminating outdated or corrupted data that could disrupt the app's performance. By doing so, the app is better equipped to accurately recognize the user's location and gain access to the relevant music library. The following steps outline how to undertake this process:
Step 1 Open the Apple Music app on your Mac.
Step 2 In the upper menu bar, select "Music > Preferences". Choose the "Advanced" section on the pop-up window.
Step 3 Click "Reset Warnings" and press "OK".
Method 6: Delete Songs from the Library and Re-Add from the "Search"
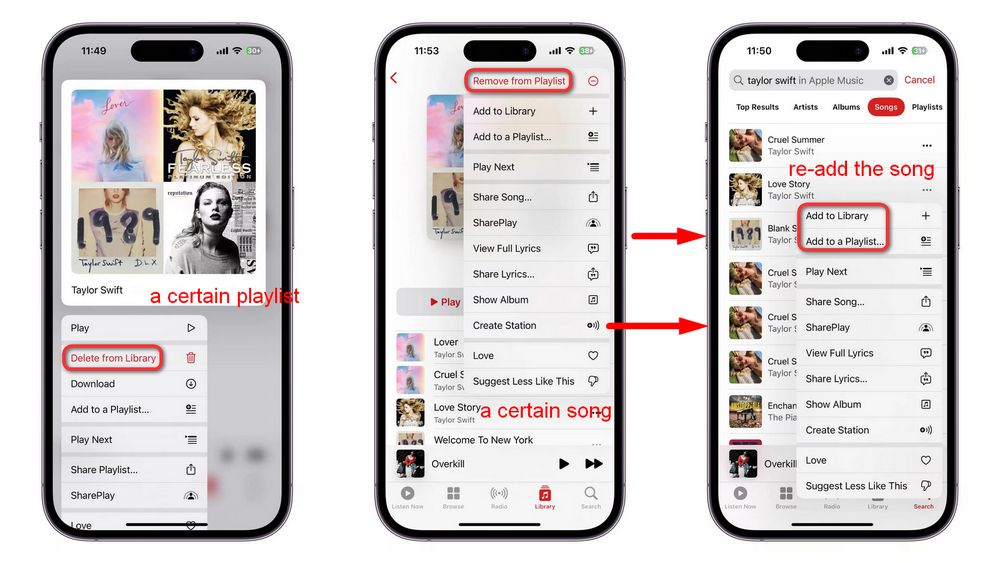
Sometimes, when a song on your Apple Music playlist is updated, a new version of the song is saved, and the original becomes invalid. To ensure that your playlist has the most current version of the song, you can remove the entire playlist or delete the individual song and then search for and re-add it.
Step 1 Open the Apple Music app and click "Library".
Step 2 Select and hold the cover of a playlist, and select "Delete from Library" from the menu that appears. If you want to delete a gray song, locate the song first. And then click on the three-dot icon on the right, and then select the "Remove from Playlist" button.
Step 3 Now click on the search bar and enter the name of the song you want to re-add. Then click "Add to Library" or "Add to a Playlist" to add it back again.
Method 7: Turn Off and Turn On Sync Library
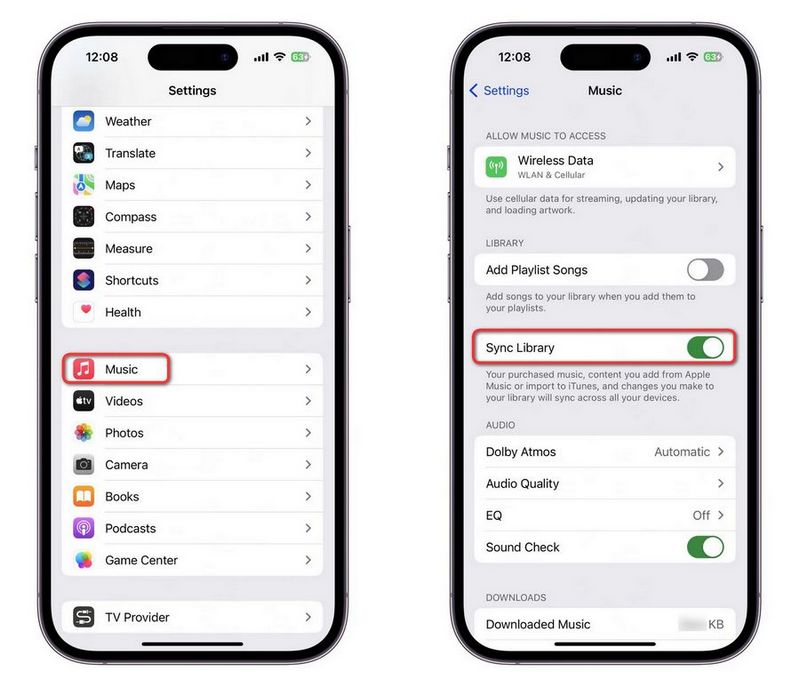
Another solution to resolve the issue of Apple Music not being accessible in your area is to disable and then re-enable the function of Apple Music library synchronization. Please refer to the following instructions:
Step 1 First, go to the "Settings" interface on your iOS device, swipe down, and select "Music".
Step 2 Then turn off the "Sync Library" button, and later, slide to turn it on again.
Method 8: Sign Out of Your Apple ID and Re-sign In
If the issue persists, it may be related to your Apple ID. We suggest signing out of your Apple ID and then signing back in to refresh your Apple Music status. We suggest signing out of your Apple ID and then signing back in to refresh your Apple Music status. This should resolve the problem.
The process is straightforward: navigate to the "Settings" menu and select your Apple ID avatar. Scroll to the bottom and click "Sign Out", then enter your Apple ID and password again.
Method 9: Force Quit Apple Music & Restart Your Device
If your device is unable to load Apple Music, try force-closing the application and restarting your device. In most cases, this will solve the problem and reconnect you to the Apple Music service. If the issue persists, it is recommended to reach out to Apple Support for personalized assistance. Their team can investigate the matter further and guide you towards possible solutions.
Part 2: How to Ensure Permanent Access to Apple Music (from Anywhere)
The methods we have outlined may provide a temporary resolution to your concerns, but there is no guarantee that a similar "This song is currently unavailable in your country or region" error message will not appear next time. Furthermore, although subscribers to Apple Music have the freedom to explore a vast collection of music, once their subscription expires, they lose access to the content. This is a common characteristic of all streaming music services. To completely avoid encountering such error messages, your best bet is to download and save Apple Music songs to your computer in MP3 or other popular audio formats so you can play them anytime, anywhere.
If you wish to download Apple Music to your computer, a reliable third-party tool is necessary. TunePat Apple Music Converter is a comprehensive software solution for both Windows and Mac users, designed to facilitate the process of obtaining Apple Music songs, podcasts, iTunes M4P music, and audiobooks with ease. The software allows you to download the audio content in formats such as MP3, AAC, FLAC, WAV, ALAC, or AIFF, with a conversion speed of up to 10X. The songs you get will retain their original sound quality and crucial ID3 tags. If you are not tech-savvy, don't worry; the program has an intuitive interface and straightforward operation. With just a few quick clicks, Apple Music songs can be made perpetually accessible in your specific country or region.
TunePat Apple Music Converter
TunePat Apple Music Converter helps you download and convert all Apple Music songs and playlists to your local computer for offline listening.
Step 1 Choose One of the Sources to Get Apple Music
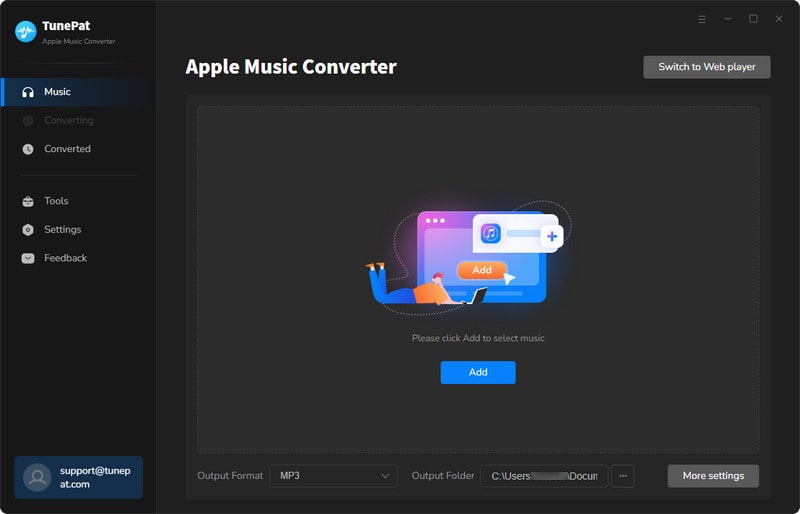
First, launch the TunePat Apple Music Converter. You will see two options on the main interface: "iTunes (APP) / Music (APP)" and "Apple Music (Web player) ".
If you choose the former (iTunes / Music APP entrance), you can support reading Apple songs, podcasts, iTunes M4P music files, and Audible audiobooks. This entry is especially recommended when using the Mac version, which can help you preserve audio quality up to Apple Hi-Res. The latter (Apple Music Web player entrance) can be accessed more conveniently. It does not require the Apple Music app or iTunes. It can read and convert songs in the embedded web player. However, this entrance does not support iTunes M4P music files and Audible audiobooks. Still, It can help you download original-quality songs, albums, podcasts, or playlists from Apple Music in batches at 10X conversion speed.

Step 2 Add the Desired Apple Music Tracks to TunePat
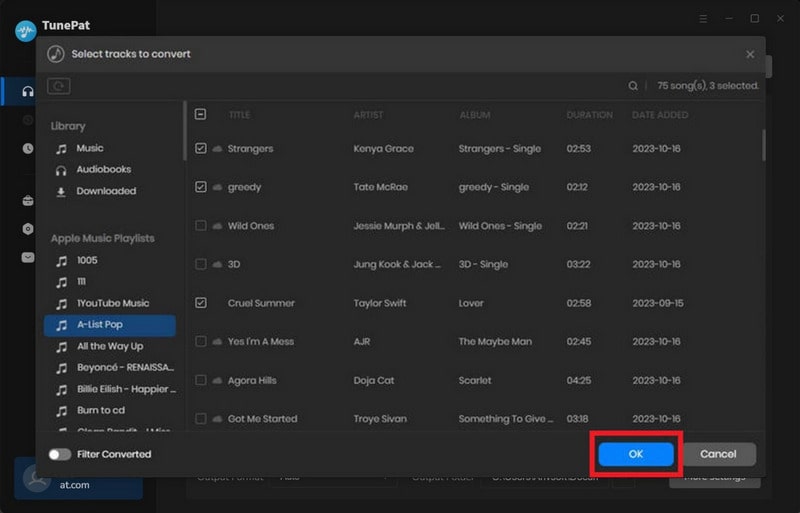
If you select the "iTunes/Music APP" mode, you will encounter a "+ Add" button on the Home interface. Clicking it will prompt a pop-up window that displays content consistent with your iTunes. Then, select the titles you wish to convert and click "OK".
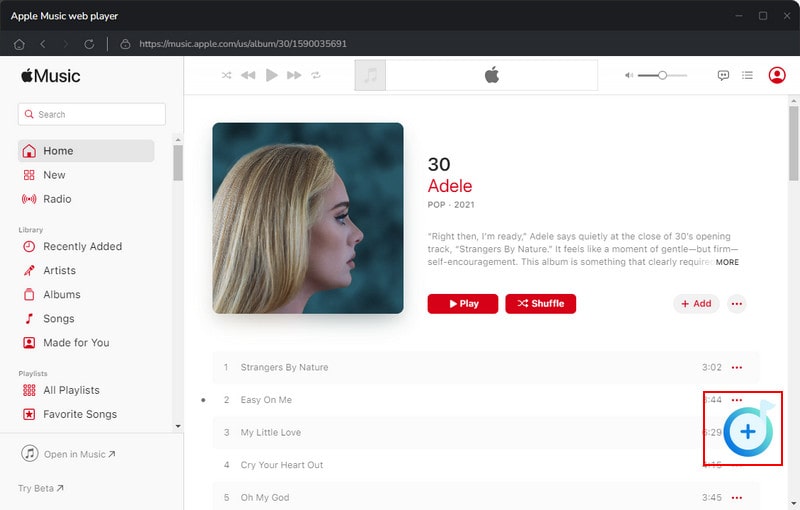
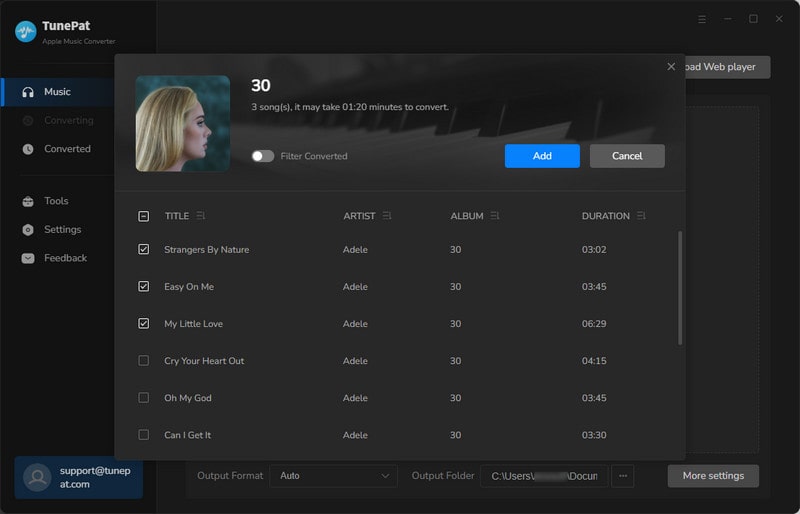
If you choose the "Apple Music Web Player" mode, you must log in with your Apple ID directly within the web player. After that, search for or find the song you wish to convert. Click to open the target song and select the blue "Click to add" button. The application will automatically scan and display all available songs on the current page. Tick off the desired titles to convert from the pop-up and then select the "Add" button to include them in the conversion list.
Step 3 Finish the Output Settings as You Like
Next, access the "Settings" menu located in the lower left corner. Within this menu, customize the conversion mode, output format, sample rate, bit rate, and other parameters to meet your specific needs. Freely combine ID3 tags to name the output files and sort the downloaded Apple Music songs by artist, album, or playlist. If sound quality is a priority, you can choose a lossless format. For compatibility with a variety of devices, we recommend using "MP3".

Step 4 Download the Selected Apple Music to Local Computer
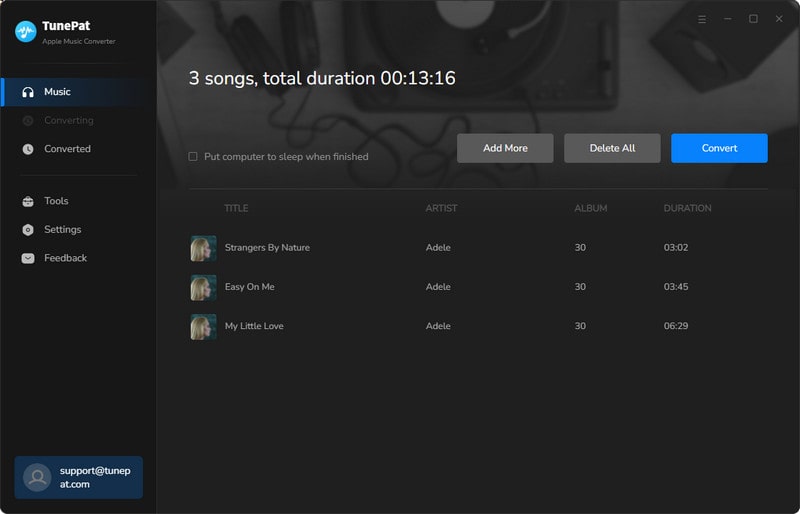
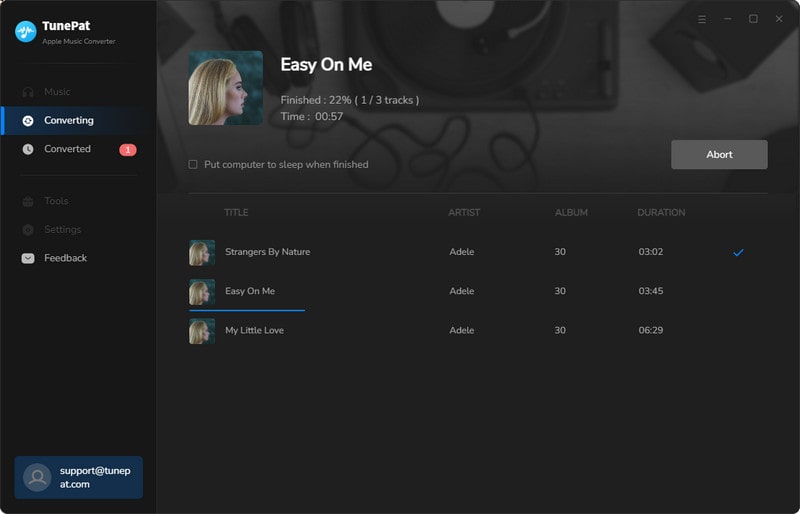
After finishing the setup, select "Home". The previously added songs are displayed on this page. If you want to add additional tracks for one-time conversion, select "Add More". When all tracks are added, click on "Convert" to begin the conversion process.
Step 5 Play Apple Music Offline in the Computer's Built-in Player
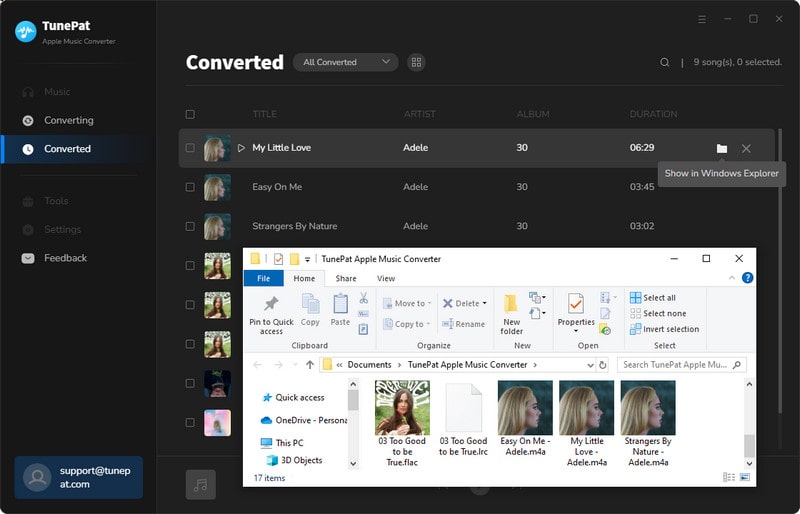
After the conversion is completed, the output folder will pop up automatically. Alternatively, you can also use TunePat as an Apple Music offline player. Browse through the "Converted" section to view or double-click to play the converted audio content. If desired, you may also drag Apple Music from the local folder to other media players for playback, such as Windows Media Player. You can also transfer it to your phone and set it as a ringtone, video BGM, and more.
Conclusion
Encountering the issue of Apple Music songs being unavailable in your region is undoubtedly frustrating. Still, armed with the solutions provided in this guide, you now have a comprehensive toolkit to troubleshoot and resolve the challenge. Most importantly, at the end of the article, we introduce a solution that can be solved once and for all. With the help of TunePat Apple Music Converter, you can play Apple Music offline in places other than the Apple Music app or iTunes. You can transfer the Apple Music downloads from your computer to any device you like. Now, don't wait! Install this amazing tool by clicking the "Download" button below immediately!

