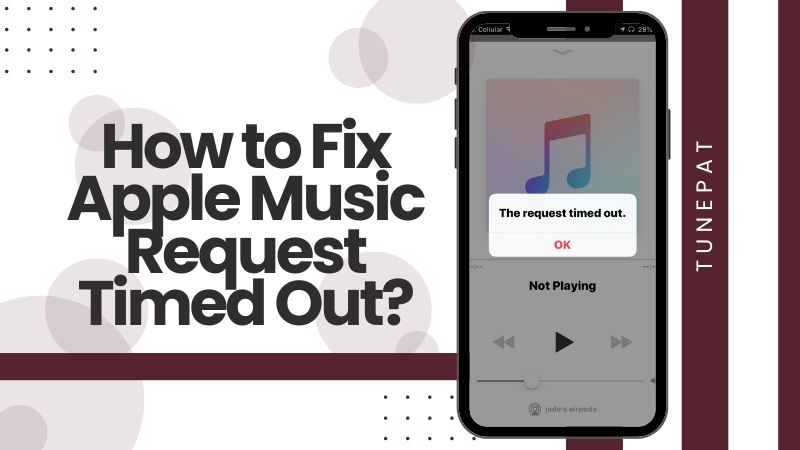
Apple Music, a leading music streaming platform, offers access to a vast music library, music videos, and live shows. Sometimes, while loading songs on Apple Music, you may come across the "Request Timed Out" error message on your screen, which indicates that your device is having difficulty connecting to Apple's servers. This issue may arise due to factors like weak internet connectivity, software issues, or network configuration errors. Identifying the underlying cause is crucial for troubleshooting this problem effectively! Follow us to fix Apple Music request timed out!
Part 1. 10 Apple Music Request Timed Out Troubleshooting Tips
1.1 Reactivate Apple Music & Your Device
Force closing and reopening the app helps to resolve potential glitches or temporary errors that may be affecting its functionality. This action essentially refreshes the app, clearing any temporary data or processes that could be causing the issue. It acts as a quick troubleshooting step to address minor software hiccups and restore the app to a stable state. You may also attempt to reboot your device or verify that mobile data is active for both your device and Apple Music. If the above basic solutions prove ineffective, there are more intricate troubleshooting steps available for you to explore.
1.2 Check The Internet Connection
Please ensure that your connection is robust and consistent without any disruptions. First, you need to confirm your router is powered on and that you're in close proximity. If you're too distant from the Wi-Fi source, signal reception may be weak, so stay within range.
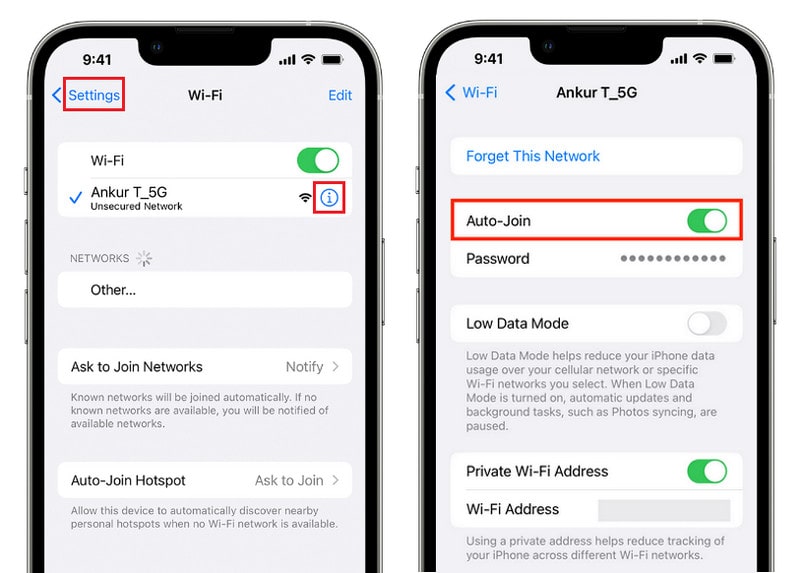
If you want to connect to the network using iOS devices, access Settings > Wi-Fi, verify your Wi-Fi is enabled, and select your network to connect. A blue checkmark next to the network indicates a successful connection. If Auto Join is off under Settings > Wi-Fi > Your Network, select More Info, then Auto-Join. If prompted, input your Wi-Fi network password.
If you want to connect to the network using Android devices, open your Settings app, tap Network & internet, and then Internet. After that, tap a listed network and enter your password.
1.3 Reset Your Network Settings
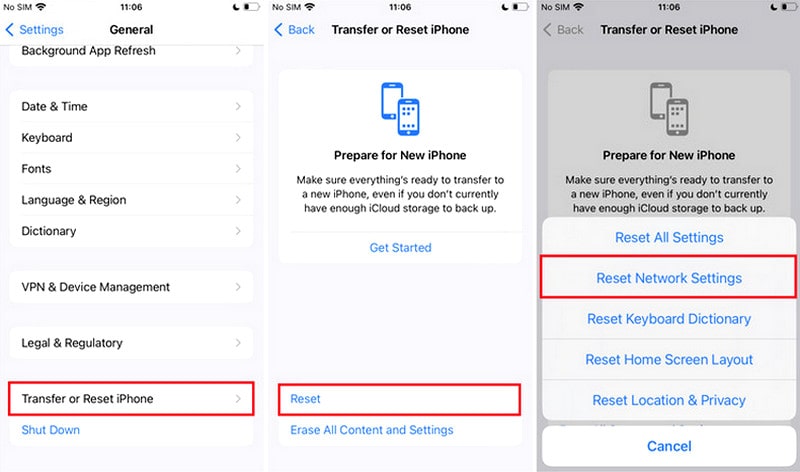
If you see the alert "No Internet Connection" or you forget your password with iOS devices, this method can help you not only reset Wi-Fi networks and passwords, but also cellular settings, and VPN and APN settings that you've used before.
If you're using iOS or iPadOS 15 or later, tap Settings > General > Transfer or Reset Device > Reset > Reset Network Settings.
If you're using iOS or iPadOS 14 or earlier, tap Settings > General > Reset > Reset Network Settings.
1.4 Reset Apple Music
Resetting Apple Music can sometimes resolve temporary issues like Request timeout errors. This process can help refresh the app and potentially fix any glitches causing the timeout error.
For iOS: Open Apple Music, tap the For You icon in the menu along the bottom of your screen, and tap your profile picture. Scroll down your profile page to select View > Choose Artists For You > Reset.
For Android: Open Apple Music, tap the ⋮ icon in the upper right corner of the screen, and tap Account (You have to be logged in to see this option). Scroll down your profile page to select View > Choose Artists For You > Reset.
For Desktop: Open Apple Music, Music, or iTunes, click Account along the top of your screen, and tap Artists For You > Reset.
1.5 Update Your Operating System
Operating system updates often include bug fixes, performance enhancements, and improved compatibility with various applications, which could help address connectivity issues. It's advisable to keep your device's operating system up to date to ensure optimal performance and potentially troubleshoot issues like timeouts on Apple Music.
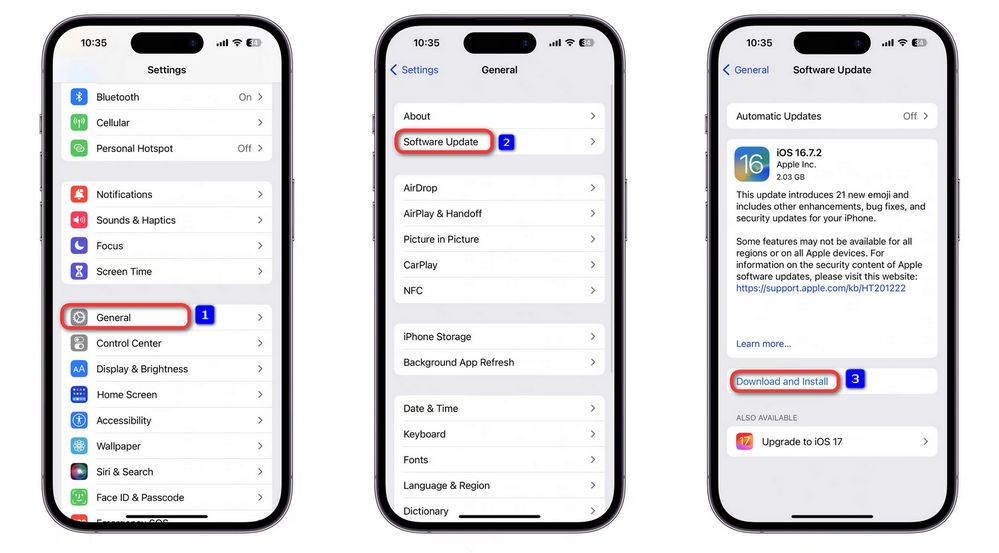
For iOS: Navigate to Settings > General and select Software Update. If there are multiple update options, pick the one you wish to install. Choose Install Now. In case you see Download and Install, select it to download the update, input your passcode, and then tap Install Now.
For Samsung Galaxy: Ensure you're connected to Wi-Fi, access your Settings, and tap Software update. Then, select Check for software updates. If a system update is ready, you'll see "Current software is up to date" on your screen. Proceed by tapping Install Now to update your phone.
For Google Pixel: Go to your Settings, tap System > System updates > Check for update. If a new update is available, follow the instructions to download it and tap OK.
1.6 Check The Status Of Apple Music & Apple ID
Ensure to confirm the status of your Apple Music subscription and Apple ID as issues with either can result in timeout errors. Verify the status by accessing your Apple Music or Apple ID account settings on your device. Navigate to iPhone or iPad's Settings > Your Username > Subscriptions to check your Apple Music subscription status and ensure your Apple ID is active.
1.7 Show Apple Music
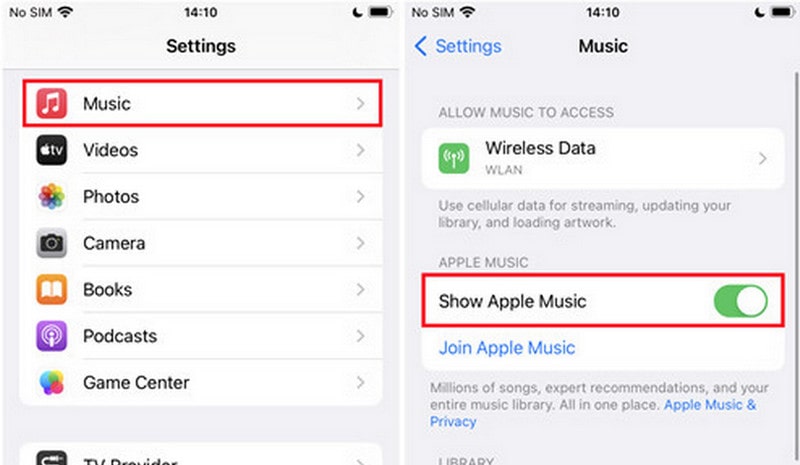
Disabling "Show Apple Music" on your device can limit access to Apple Music's features and content. Access your device's settings and locate the Apple Music or Music settings section. Navigate to Settings > Music > Show Apple Music. Ensure that this option is activated.
1.8 Turn Off The Country Filter
It's possible that certain IP addresses used by Apple Music might have been geotagged incorrectly, leading to issues with access when the country filter was enabled on your router. There was a restriction or block in place for certain regions like Russia, China, and North Korea that was impacting the streaming service. By disabling this filter, you were able to access Apple Music without any problems. In such cases, disabling the country filter would allow you to bypass any restrictions imposed by these geotags, enabling smoother access to the service.
1.9 Turn Off Apple Music Restrictions
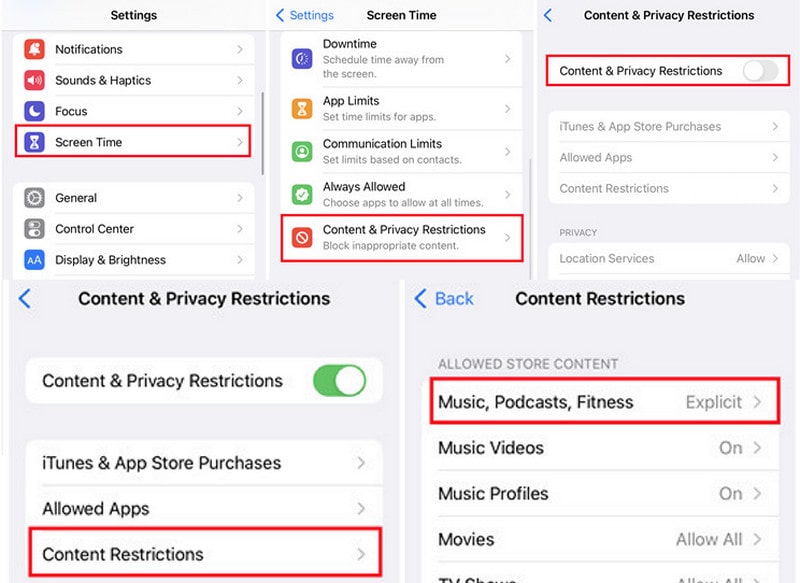
Apple Music includes content and privacy restrictions that can restrict access to specific songs, explicit content, and features. These restrictions may be linked to the "Request Timed Out" error. Just access your device's settings and locate the Content & Privacy Restrictions section within the Screen Time settings. Review these settings and ensure they are not overly restrictive, blocking access to desired content. Modify them as required to allow the desired level of access. Simply toggle off the Content & Privacy Restrictions option or delve into Content Restrictions and enable access to all content.
1.10 Verify Date and Time Settings
Inaccurate date and time settings may disrupt connections to Apple Music so here we listed how to set date and time settings on different devices, including iOS devices, Android devices, PC, Mac, and Apple TV.
For iOS: Ensure you have the latest iOS or iPadOS version and activate Set Automatically in Settings > General > Date & Time to sync with your time zone. If prompted with a time zone update message, restart your device and any connected Apple Watch. Then allow location access for time zone detection in Settings > Privacy & Security > Location Services > System Services > Setting Time Zone.
For Android: Open the Clock app, and tap More > Settings. Then tap Change date & time and then Set time zone automatically.
For PC: Go to the Settings app, click Time & Language in the sidebar, and click Date & Time. Turn on Set Time Automatically, if it is not correct, locate the Set the date and time manually option and click Change.
For Mac: Confirm internet connectivity on your Mac, enable Location Services, and ensure Time zone and system customization is on in System Services. Activate automatic time and date settings in the Date & Time preferences on the right and restart your Mac.
For Apple TV: First, you require tvOS 10 or later on Apple TV HD or Apple TV 4K and a stable internet connection. After that, navigate to Settings > General > Time Zone for updates if prompted after a restart. If there is no update message, press and hold Back or Menu on the remote, return to Settings after a few minutes, and check for updates.
Part 2: The Best Way to Fix Apple Music Request Timed Out
When encountering "Request Timed Out" errors on Apple Music, downloading tracks for offline listening can be a solution. While Apple Music offers offline downloads for subscribers, these files are encrypted. To download Apple Music tracks for offline listening on any device, you can utilize tools like TunePat Apple Music Converter to unlock and enjoy your music without restrictions.
This software allows you to download Apple Music locally and convert it into popular audio formats like MP3, FLAC, WAV, AAC, and more. It provides customization options for the output format, bit rate, and sample rate, enabling you to download your favorite songs from Apple Music and retain them losslessly. No need to worry about not just Request Timed Out errors but also any other errors!

TunePat Apple Music Converter
Step 1 Choose The Audio Source
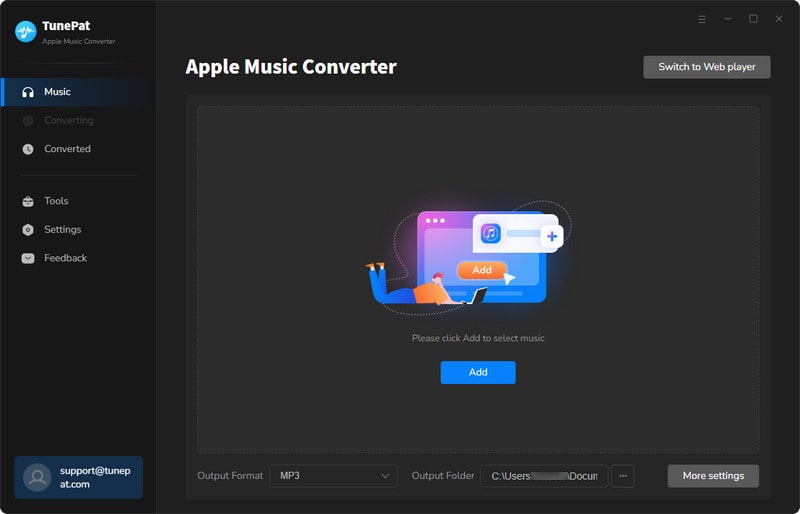
Download TunePat and you will see two convert options after you activate it. Using the iTunes app to download tracks, you need to install iTunes on your PC or Mac first. Using the Apple Music web player, you can just save music from TunePat's inbuilt web player conveniently.

Step 2.1 Record Apple Music from iTunes App
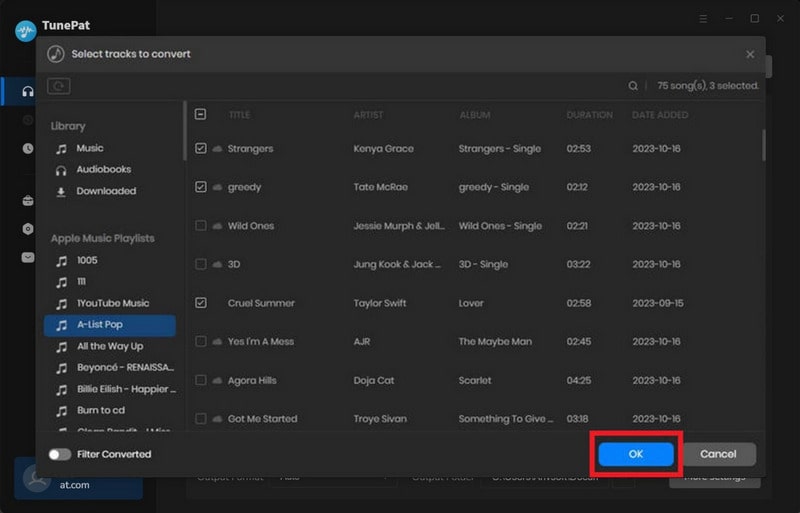
Click "+ Add" to access your iTunes library or drag Apple Music songs directly into TunePat. Select desired songs from iTunes for conversion and click "OK" to load them quickly.
From this list, you can select the desired songs for conversion from iTunes and click "OK". Then TunePat will then load the chosen songs quickly.
Step 2.2 Record Apple Music from Apple Music Webplayer
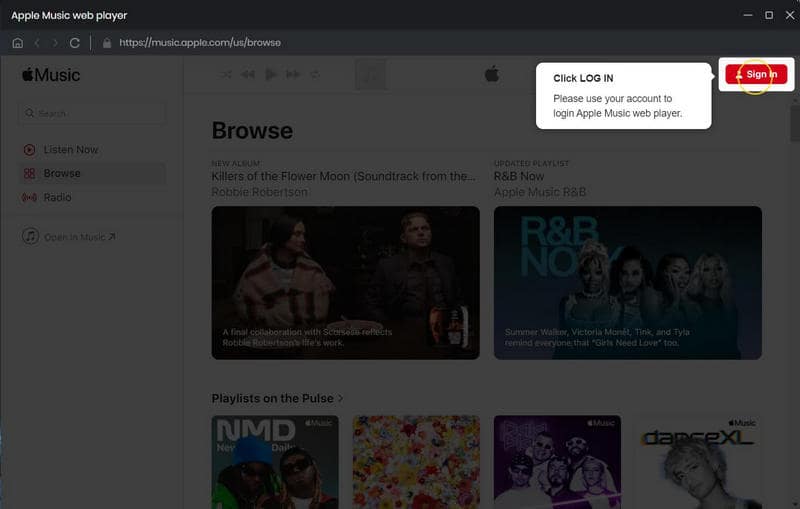
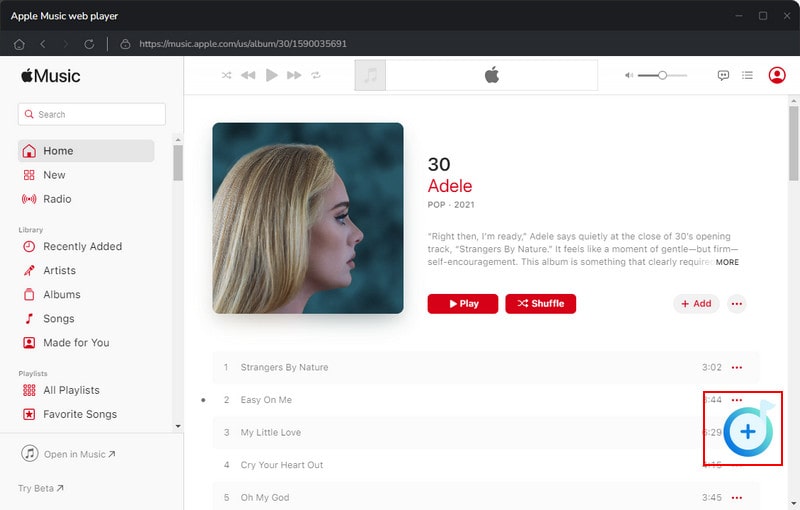
Open TunePat Apple Music Converter to log into your Apple ID through the official Apple Music web player. Simply select the music you want to download, click on the "Click to add" button, and then click the "Add" button to add these selected songs to the conversion list.
Step 3 Set up the Output Settings
Customize output format, audio quality, download structure, and other parameters in the Settings menu. MP3 is a popular choice for output format if you want to play your music on different devices.

Step 4 Convert Apple Music to Convert
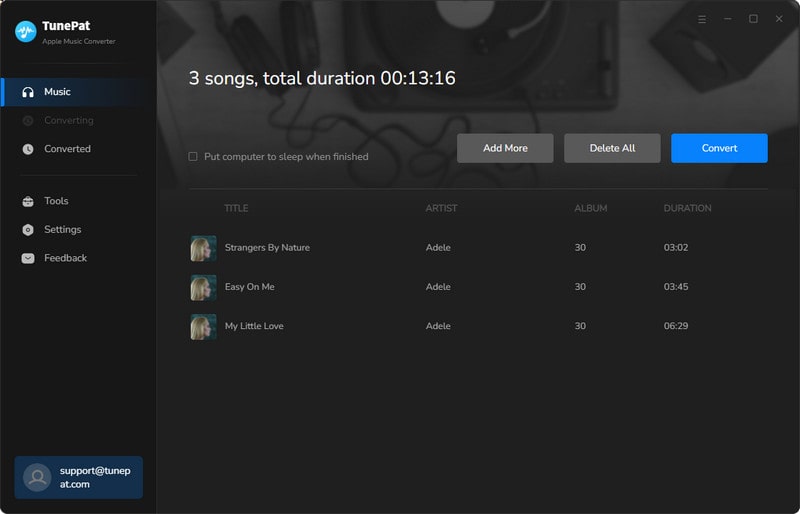
Initiate the conversion process by clicking the "Convert" button. Use "Add More" to select additional music for batch conversion.
Then hit the Convert button to start the download process. You can also click the Add More button to select more music from different playlists or albums for batch conversion.
Step 5 Converting Apple Music in the List
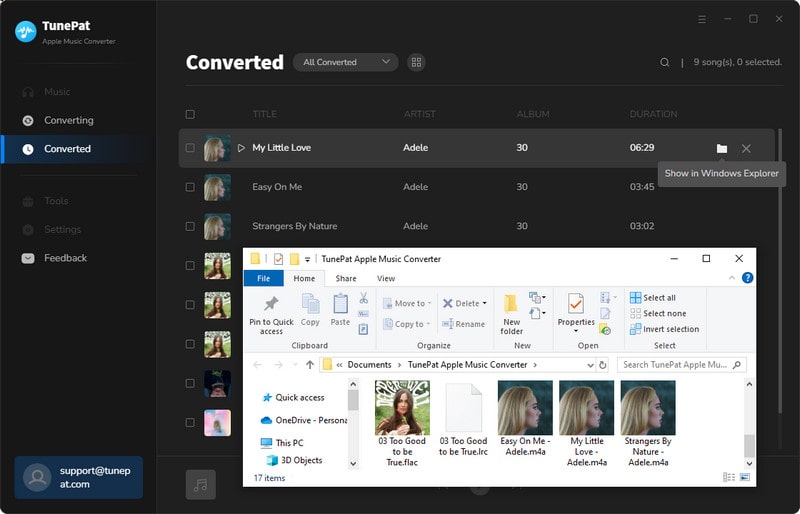
Wait for the conversion to finish, and the downloaded folder will open automatically. If you want to activate it manually, just go to the "Converted" section, and access the converted files by clicking the file icon next to the titles or in the download folder.
Conclusion
In conclusion, by implementing these 11 effective tips to address Apple Music's "Request Timed Out" issue, you can enhance your music streaming experience. From optimizing network settings to exploring a reliable tool for offline listening, these solutions aim to ensure seamless connectivity and uninterrupted access to your favorite tunes on Apple Music. No need to be bothered by the Request Timed Out error! Embrace these 100% working strategies to troubleshoot and overcome this annoying error right now and enjoy your music without interruptions.
For the most effective approach, TunePat Apple Music Converter is recommended for saving Apple Music tracks as local media files, ensuring smooth access to Apple Music content, away from any error. Delve into your Apple music preferences with TunePat today!




Delilah Rene
Senior Writer