‘How to cancel the Apple Music subscription? Do I still have access to downloaded Apple music after unsubscribing Apple Music? How can I keep Apple Music forever?’
Do you also have the same questions? Don’t Worry! You will find the answer to those questions here.
Apple Music is one of the most popular subscription-based music streaming services in the market. It offers two subscription plans: individual and family. If you want to cancel the subscription, the process is fairly easy. But bear in mind that, Apple Music encodes all its media content with an exclusive format, which confines members to playing music only within its app and the subscription period. Therefore, it is obvious that you will lose access to all of the Apple Music songs after canceling the subscription, even though you've downloaded them to your devices. If you insist on canceling your Apple Music membership, you can check out Part 1 to get 7 ways to cancel the Apple Music subscription. If you want to keep Apple Music songs forever on your device, the easy method listed in part 2 will be your perfect option.
Part 1. How to Cancel Apple Music Subscription
Part 2. How to How to Keep Apple Music Forever After Unsubscribing

Method 1: Unsubscribe on iPhone or iPad
Method 2: Unsubscribe on Android Devices
Method 3: Unsubscribe on Apple Watch
Method 4: Unsubscribe on Mac
Method 5: Unsubscribe on iTunes
Method 6: Unsubscribe on Web
Method 7: Unsubscribe on Apple TV
To unsubscribe from Apple Music on your iPhone or iPad, you could cancel it either in the Settings or Apple Music app.
Cancel Subscription in Settings:
Cancel Subscription in Apple Music App:
Android users also can unsubscribe it within the Apple Music app.
Cancel Subscription in Apple Music App:
If you subscribed to Apple Music through the Play Store, you could directly cancel it through the storefront. Open the menu in the Play Store app and select Subscriptions to find Apple Music. Tap Remove next to Apple Music to unsubscribe from the service.
Cancel Apple Music Subscription on Apple Watch:
Cancel Apple Music Subscription on Mac:
If you are running either macOS Catalina or Big Sur, you can unsubscribe from Apple Music more easily. Just click the Apple icon > System Preferences > Apple ID and click Media & Purchased on the sidebar, then click the Manage button to find all your subscriptions. Now, click the Edit button next to Apple Music Subscription to cancel this subscription.
To unsubscribe from Apple Music on Windows PC or Mac (macOS X 10.14 or earlier), you could cancel the subscription through the iTunes app.
Cancel Apple Music Subscription on iTunes:
Apple Music is also accessible on the website to enjoy music from its web player and even manage your subscription. Thus, you are able to unsubscribe from Apple Music through the website.
Cancel Apple Music Subscription on Web:
Apple Music app is added to the fourth-generation Apple TV and Apple TV 4K. Therefore, you can also manage your subscription in your Apple ID directly from the TV.
Cancel Apple Music Subscription on Apple TV:
These are 7 ways to cancel Apple Music Subscription on all devices accessible to Apple Music. Just pick a method to unsubscribe from Apple Music, and you can keep using Apple Music until the next billing date.
Please Note: If you cancel your Apple Music subscription during the free trial period, you might immediately lose access to Apple Music. You should cancel it 1 or 2 days before the billing date.
As mentioned initially, once your Apple Music subscription ends, you will lose access to all music from Apple Music, even the app's downloaded songs. The downloaded songs within the Apple Music app are saved as protected media files, which are only limited to be played within the app. Therefore, if you want to keep them forever, you need to convert Apple Music to an open-source format.
TunePat Apple Music Converter is a smart tool that could help you convert Apple Music and save them as MP3, AAC, AIFF, FLAC, and WAV formats. It is one of the professional media converters for Apple Music. Unlike other Apple Music converters, the program converts music directly from the Apple Music web player, which means you do not need to install the Apple Music app on your computer. It supports converting music to MP3, AAC, FLAC, WAV, and even AIFF format (the first choice of file format for DJ). Plus, TunePat Apple Music Converter works at up to 10X faster speed, which is much quicker than other converters. Find out more about TunePat Apple Music Converter (Win/Mac)
Key Features of TunePat Apple Music Converter

TunePat Apple Music Converter
Here, you will find the step-by-step tutorial to download music from the Apple Music web player and save them forever. Before getting started, please make sure you have downloaded and installed the latest version of Apple Music Converter.
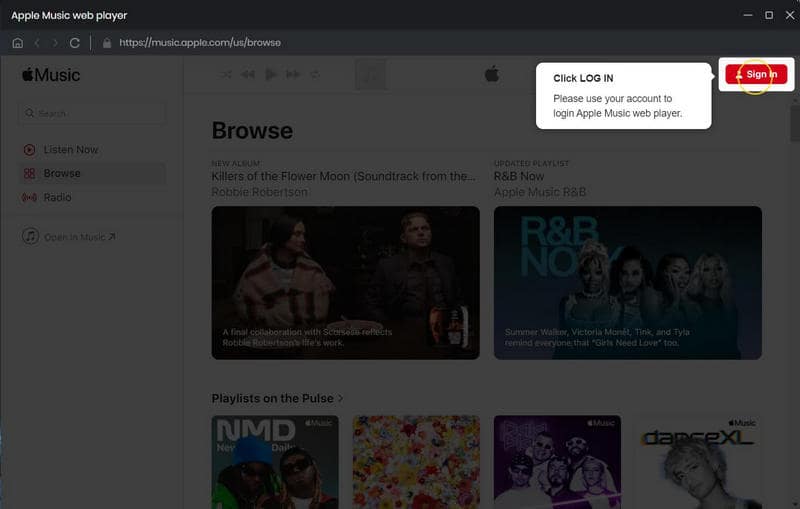
Step 1Sign in Your Apple ID
After installation, please launch TunePat Apple Music Converter, and then follow the indicates to open the login page. Please enter your Apple ID info to let TunePat access your Apple Music library.
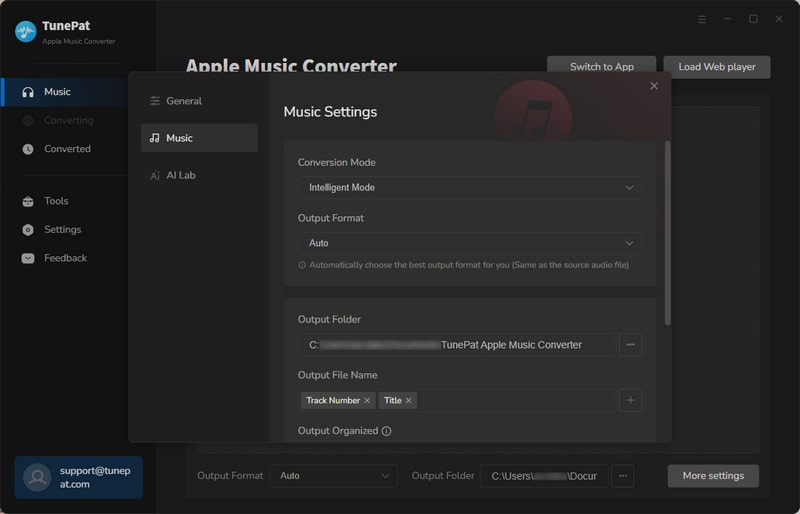
Step 2Customize the Output Settings
Next, please tap on the "Settings" icon (looks like a gear on the top right corner). The setting window will pop up, letting you set the output format (AUTO/MP3/AAC/WAV/FLAC/AIFF/ALAC), audio quality, the download location, and to choose to organize the output files by Artist, Album, Artist/Album, Album/Artist, or Playlist. Here please select "MP3" as the output format.
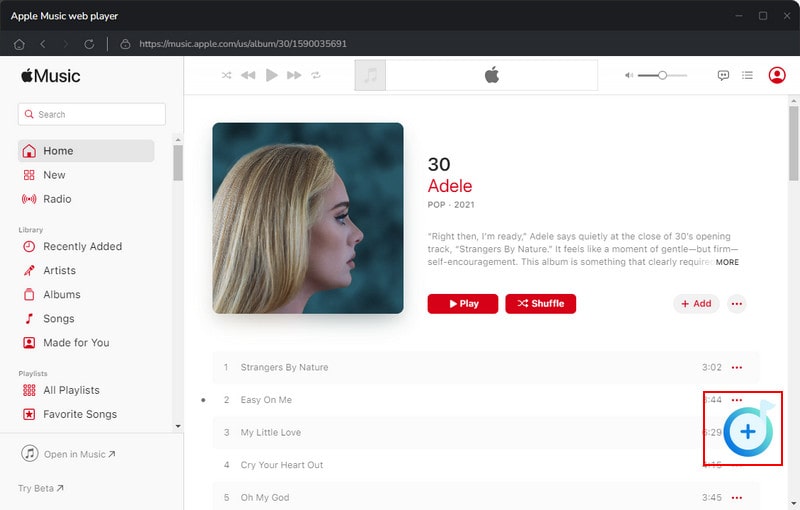
Step 3Add Apple Music Tracks
Now, you need to add your desired tracks to download. Just choose a playlist/artist/album, click the blue Add button suspended on the bottom right corner of the screen, then please select the songs you want to download from the pop-up adding window.
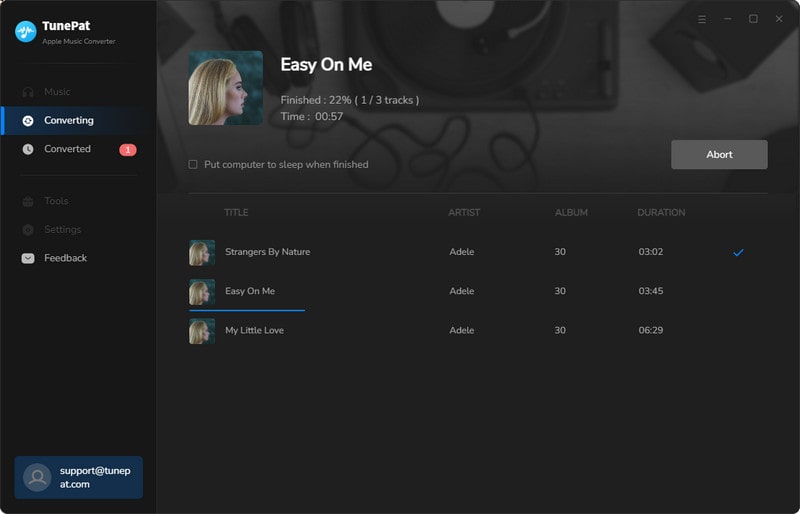
Step 4Download Apple Music in MP3
The final step is to click the "Convert" button to start downloading Apple Music songs in MP3 format.
The last thing to do is finding the converted Apple Music songs in the "History" and click the folder icon.
Now, you have the Apple Music files saved on your computer, and you will have access to them forever. Of course, you also can transfer Apple Music files to an external hard drive or other devices. There are no limitations to share and play music on different devices.
To keep Apple Music forever, TunePat Apple Music Converter is the tool you cannot miss. It is truly a great and easy-to-use tool for you to convert Apple Music, and you will never lose access to the songs anymore. Just try this smart tool out by clicking on the ‘Download’ button.
What You Will Need
New Release


Hot Tutorials