

TunePat Amazon Music Converter
Amazon Music Unlimited is a gorgeous yet subscription-based music streaming service provided by Amazon. You are served with a 30-day free trial period to access its vast music library of over 100 million songs. After the trial, you will be charged $10.99 a month automatically on the date you signed up if the service is not canceled manually.
So, if you decide not to continue this service, please do remember to cancel the Amazon Music Unlimited subscription before the billing date. At this moment, you'll need the easiest steps to help you say goodbye to Amazon music. Let's go through a complete guide on how you can cancel your Amazon Music Unlimited subscription with a few clicks. In addition, we also explain four attention points before the cancellation and what will happen after your cancellation. Now, read through the following text if you are interested.
Part 1: What you need to know before canceling the subscription
Part 2: How to cancel Amazon Music Unlimited subscription
Part 3: Can I keep Amazon downloads even after canceling the subscription

Before you cancel Amazon Music Unlimited, you need to know the following tips:
Amazon Music Unlimited offers a free trial period for only 30 days. If you didn't cancel before the end of that free trial, Amazon automatically bills you for the subscription fee after the trial ends. A “day” is measured beginning at the time you start your free trial period and ending 24 hours later. So be sure to complete the subscription cancellation before the charging date.
If you cancel Amazon Music Unlimited right after you sign up for the 30-day trial, you can still use it for the full trial period without being billed.
After the end date, you will not have access to the service any longer. Any Amazon Music Unlimited titles added to Library will be grayed out, with playback options removed. Of course, all of your downloaded songs will be unavailable, too.
If you cancel Amazon Music Unlimited, you can re-register at any time. However, if you come back to this service, you will no longer get a 30-day free trial.
If you haven't deleted the Amazon Music app on your device, after re-registering, you can stream those playlists you created before the cancelation. You can also listen to the songs you downloaded last time.
In general, you need to navigate to the "Amazon Music Settings" page to cancel the subscription. Below are the detailed steps:
Step 1 Go to the Amazon Music Settings page.
Step 2When the login screen pops up, please enter the "email or mobile phone number account number" and "password", and click "Login".
This will bring up the Amazon Music Unlimited settings screen. Your current registered plans and their prices are displayed there.
Step 3 On the screen, select the “Cancel subscription” option in your “Subscription Renewal” details.
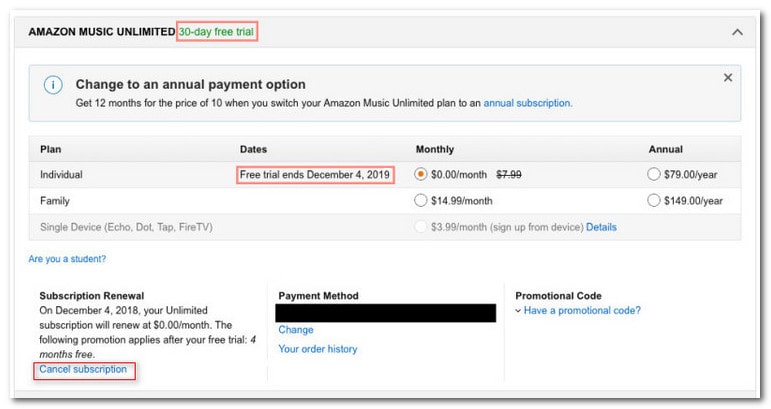
Step 4 Select the reason for canceling and then confirm the cancellation.
If you registered as a member of Amazon Music Unlimited through Apple, you can follow the steps below to cancel it.
Step 1 On your computer, open iTunes. Then from the menu bar at the top of the iTunes window, choose "Account", then choose "View My Account". You might be asked to sign in with your Apple ID.
Step 2Click "View Account". And scroll to the Settings section.
Step 3 Next to Subscriptions, click "Manage", then "Edit" (next to the Amazon Music Unlimited subscription).
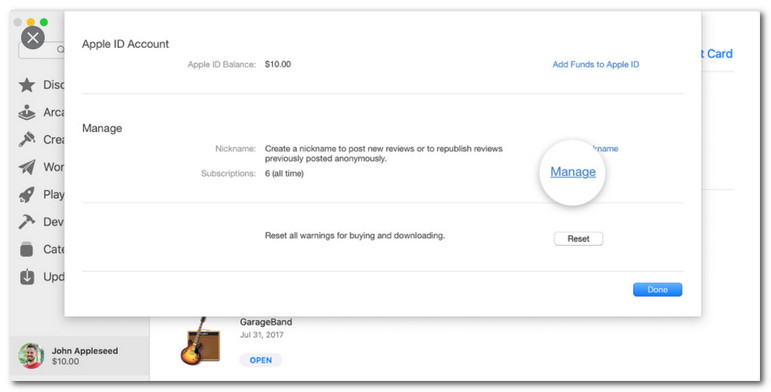
Step 4 Finally, click "Cancel Subscription". A confirmation message will appear, simply follow the on-screen instructions to confirm the cancellation. If you don’t see Cancel Subscription, then the subscription is already canceled and won't renew.
You are not able to enjoy your downloads from Amazon Music Unlimited once your free trial is over unless you download and convert those Amazon songs to an open-source format before the end date of your subscription. Here, we recommend you use a professional Amazon Music Converter -- TunePat Amazon Music Converter to download Amazon music in MP3 format. With its help, you can easily download any songs from Amazon Music Unlimited, even from Prime Music, to MP3, AAC, WAV, FLAC, AIFF or ALAC format, and enjoy them anywhere anytime.
Key Features of TunePat Amazon Music Converter

TunePat Amazon Music Converter
TunePat Amazon Music Converter supports keeping ID3 tags and excellent audio quality in the output files. After fast conversion, all your songs, no matter from Amazon Music Unlimited or Prime Music, will be stored locally. Let’s check out the steps below to get how exactly you can do it.
Step 1 Choose the Audio Source.
Launch TunePat Amazon Music Converter on your computer, then you need to choose the audio source: Amazon Music app or Amazon Music web player. Just pick the one you prefer, you can also check the difference below.
Amazon Music app: copy the album/playlist URL to add songs or directly drag and drop. This mode supports adjusting convert speed (1x/5x), and preserves up to Ultra HD audio quality.
Amazon Music web player: directly browse and add songs on Amazon Music web player. This mode supports 10x downloading speed and preserves up to HD audio quality.
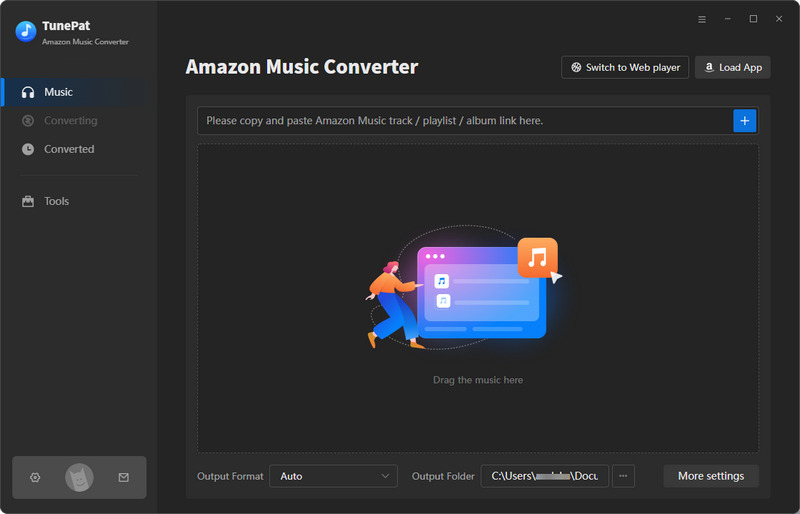
Step 2 Choose the Output Formats.
Go to the "Settings" option in the lower left corner to choose the output format and audio quality you need, you can also customize the output path. If you want to download the best audio quality, please choose Amazon Music Record (Amazon Music app source) or Web Download (Amazon Music web player source) under Conversion Mode, then choose "Auto" as the output format which means TunePat will download the original quality.
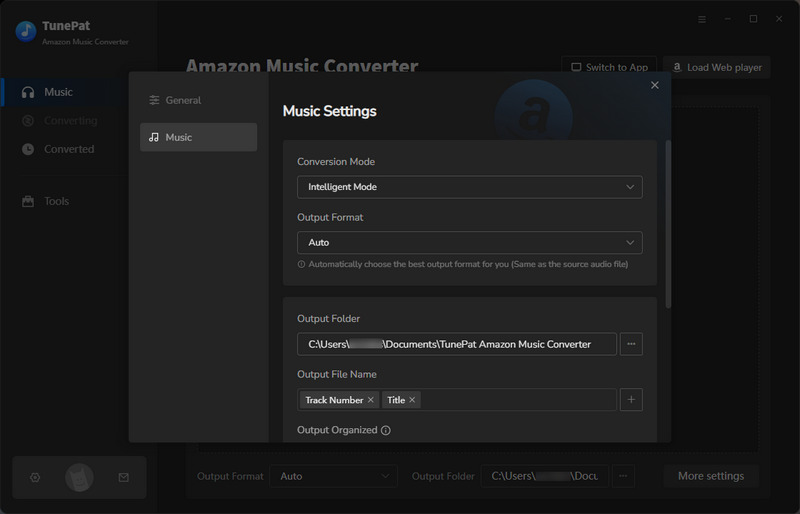
Step 3 Select Amazon Music and Add to TunePat
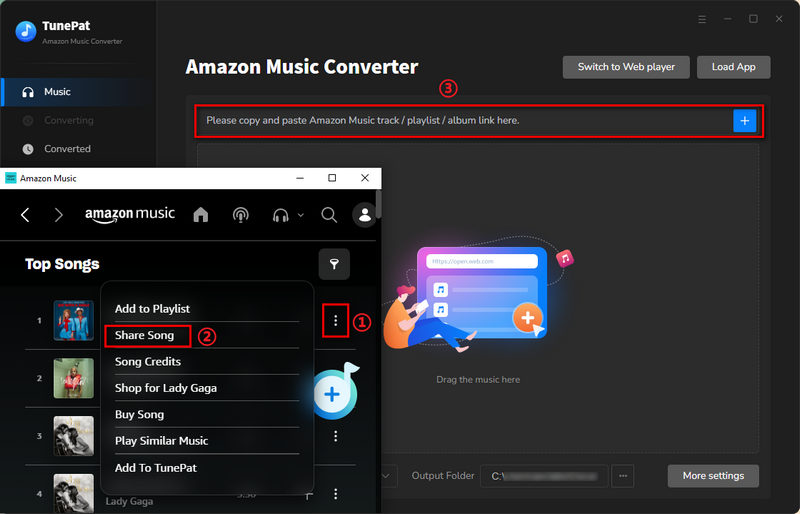
Amazon Music App: make sure you have installed the latest Amazon Music app on your computer. When you start TunePat, the Amazon Music app will start automatically. Select the song, album, or playlist that you want to download, and then click the "..." icon. Tap on the "Share" button from the drop-down menu. Copy the link and paste into the TunePat search box on the main interface, and click "+" button to add songs.
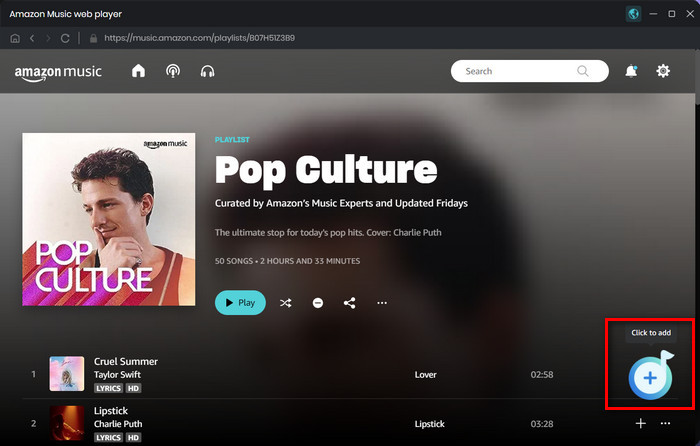
Amazon Music Web player: open a playlist or album on the Amazon Music web player, and click the blue Click to add button on the right side. Then TunePat will show you all the songs as a list, just select the songs that you'd like to download and click "Add button to enter the convert page.
Step 4 Download Amazon Music to Computer
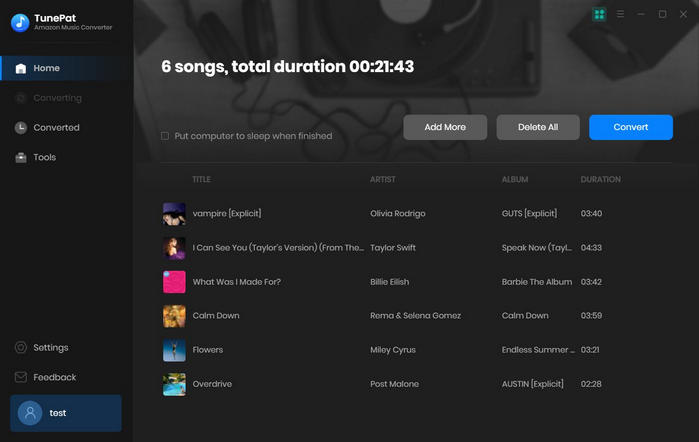
On the convert list, you can click the "Add More" button to select more songs for batch conversion. Then click the "Convert" button to start the downloading process. Once it is finished, go to the "Converted" option on the left list to check the downloaded Amazon Music songs.
With the help of TunePat Amazon Music Converter, you can easily download lossless quality Amazon Music songs for offline playback. The downloaded Amazon Music songs will be saved on your computer forever even after your Amazon Unlimited/Prime subscription expired. You can play the songs on any compatible device such as MP3 player, iTunes, mobile phone, etc.
Now, your Amazon Music Unlimited subscription should have been canceled. Please do remember to follow the guide to cancel your subscription, before the billing date, so that you can avoid the renewal charge. Plus, all your downloaded songs from Amazon Music Unlimited will no longer be available once your subscription is over. Therefore, if you want to keep them playable, please also download them in normal format by using TunePat Amazon Music Converter during your Amazon subscription.
What You Will Need
New Release
Hot Tutorials